SUBJECT VEHICLE: 2005-11 Volvo V Series.
RELEARN PROCEDURE? Yes.
SPECIAL TOOLS NEEDED? Yes. A Low Frequency Initiator (sensor activation tool) can be used.
The tire pressure monitor system (TPMS) on the 2005-11 Volvo V Series uses sensors mounted in the tire valves to check inflation pressure levels.
When the vehicle is moving at a speed of 25 mph or faster, these sensors transmit inflation pressure data to a receiver located in the vehicle. There are programmed tables in the control module containing the recommended air pressure for the vehicle.
The information about the air pressure in the tires transmitted from the sensors is compared with the programmed values in the control module. If the tire pressure deviates too much from the recommended value a warning message is displayed in the driver information module (DIM)
NOTE: This system may not function properly if the vehicle is equipped with wheels that do not have an appropriate tire pressure sensor.
Tire pressure monitor warning indicators
When low inflation pressure is detected, the TPMS will illuminate the tire pressure warning light in the instrument panel, and will display a message in the text window. The wording of this message is determined by the degree of inflation pressure loss. If wheels without TPMS sensors are mounted on the vehicle, TIRE PRESS SYST SERVICE REQUIRED will be displayed each time the vehicle is driven above 25 mph for 10 minutes or more.
When the tire pressure warning message has been displayed and the warning light comes on, immediately check the air pressure of all tires and adjust to the specified pressure listed on the tire label. In certain cases, it may be necessary to drive the vehicle for 10 minutes or more at 25 mph or faster.
Make sure the warning light goes off. If the warning light stays on, there is a malfunction in the TPMS. See appropriate manufacturer service information.
When the system detects a malfunction, the telltale will flash for approximately one minute and then remain continuously illuminated.
This sequence will continue upon subsequent vehicle start-ups as long as the malfunction exists.
Reset procedures
NOTE: Volvo vehicles do not require a formal reset procedure for any of the TPMS functions. Tire pressure sensor IDs are automatically programmed while driving.
When the tire pressure warning message has been displayed and the warning light comes on, immediately check the air pressure of all tires and adjust to the specified pressure listed on the tire label. In certain cases, it may be necessary to drive the vehicle for 10 minutes or more at 25 mph or faster. This will erase the warning text and the warning light will go out.
Tire pressure sensor learn
NOTE: When installing TPMS sensors, the vehicle must be parked for at least 15 minutes with the ignition off. If the vehicle is driven before 15 minutes has elapsed, a TPMS error message will be displayed.
After replacing tire pressure sensors, the control module does not need programming. The control module automatically contacts the sensor itself after driving the vehicle at least 25 mph for 10 minutes or more. The TPMS indicator light will go out when all sensor IDs are learned.
NOTE: A Low Frequency Initiator (sensor activation tool) can be used instead of driving.
Demounting/mounting procedures
CAUTION: The tire should be demounted from the wheel using the tire changer manufacturer’s instructions. Use of their specific information will avoid damage during the demounting/mounting procedures.
CAUTION: Only factory-mounted wheels are equipped with TPMS sensors in the valves. NOTE: If the vehicle is equipped with a temporary spare tire, this tire does not have a TPMS sensor.
CAUTION: When inflating tires with TPMS valves, press the pump’s mouthpiece straight onto the valve to help avoid bending or otherwise damaging the valve.
Tire pressure sensor
IMPORTANT: Always make sure the correct sensor is being used and be sure to replace the sensor with the correct part number. The vehicle may be equipped with either a one-piece type sensor or a two-piece “snap-fit” type sensor. Replace with matching sensor-type, or see manufacturer service information to determine appropriate application.
CAUTION: When inflating tires with TPMS valves, press the pump’s mouthpiece straight onto the valve to help avoid bending or otherwise damaging the valve.
One-piece sensor removal
1) Remove the wheel.
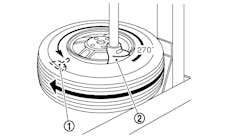
CAUTION: Do not use tools within the marked area (see Figure 1).
CAUTION: Always start outside the marked area and continue in the direction from the valve.
CAUTION: Release the tire bead from the wheel rim diagonally opposite to the valve.
2) Remove the tire from the rim.
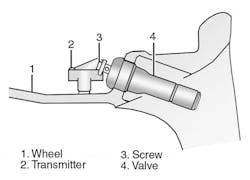
3) Remove the sensor nut, then remove the sensor (see Figure 1).
[PAGEBREAK]
One-piece sensor installation
1) Install the sensor and tighten nut to 44 in.-lbs. (5 N.m.).
CAUTION: Do not use tools within the marked area (see Figure 1).
CAUTION: Always start outside the marked area and continue in the direction from the valve.
2) Fit the tire and balance the wheel.
3) Install the wheel.
4) After replacing sensors, the control module does not need programming. The control module automatically contacts the sensor itself after a few minutes driving. LF Initiator can be used instead of driving.
Tire pressure sensor
IMPORTANT: Always make sure the correct sensor is being used and be sure to replace the sensor with the correct part number.
The vehicle may be equipped with either a one-piece type sensor or a two-piece “snap-fit” type sensor. Replace with matching sensor-type, or see manufacturer service information to determine appropriate application.
CAUTION: When inflating tires with TPMS valves, press the pump’s mouthpiece straight onto the valve to help avoid bending or otherwise damaging the valve.
Two-piece sensor removal
1) Remove the wheel.
CAUTION: Do not use tools within the marked area (see Figure 2).
CAUTION: Always start outside the marked area and continue in the direction from the valve.
CAUTION: Release the tire bead from the wheel rim diagonally opposite to the valve.
2) Remove the tire from the rim.
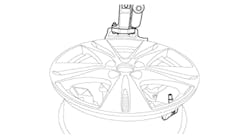
3) Remove the sensor from the valve (see Figure 3).
4) Remove the valve (see Figure 3).
Two-piece sensor installation
NOTE: Always use new valves and Torx screws when replacing tires.
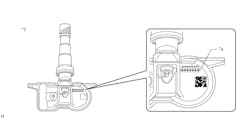
1) Install the sensor on the valve. Tighten a new Torx screw to 44 in.-lbs. (5 N.m.).
2) Brush the valve (1) with soapy water and install the valve on the rim (see Figure 4).
CAUTION: Do not use tools within the marked area (see Figure 2).
CAUTION: Always start outside the marked area and continue in the direction from the valve.
3) Fit the tire and balance the wheel.
4) Install the wheel.
5) After replacing sensors, the control module does not need programming. The control module automatically contacts the sensor itself after a few minutes driving. LF Initiator can be used instead of driving.
Torque specifications:
Component Ft.-lbs. (N.m)
Wheel nut 1..............................103 In.-lbs. (140 N.m)
Tire pressure sensor nut (one-piece sensor).....71 (8)
Torx screw (two-piece sensor)........................ 44 (5)
Use torque socket (951 2835) if a nut runner is being used. This torque socket is designed for use with a standard, pneumatic impact nut runner providing a torque of 184-258 ft.-lbs. (250-350 N.m). ■
Information for this column comes from Mitchell 1’s “Tire Pressure Monitoring Systems Guide” for domestic and import vehicles through 2013. Headquartered in Poway, Calif. For more information, visit www.mitchell1.com. Previous columns are available on www.moderntiredealer.com.
For more articles on TPMS, see:
Train Mustang sensors when the front and rear pressures differ


