There´s more to installing custom wheels and performance tires onto a vehicle than banging them on and shoving the car out the door. The customer is likely paying a premium for the parts and the labor, so it´s only right to perform the job properly.
CLEANING
Before approaching the vehicle with tire/wheel in hand, take a few minutes to inspect the mating area first. Closely inspect the wheel mounting surfaces and clean as needed. This includes anything that might create axial runout, such as rust scale, dirt, grime, dried paint deposits, etc.
The surface of the hub and the mating surface of the wheel must be clean. If the wheel has been used previously, also inspect and clean the wheel´s hub mating surface.
Depending on the wheel design, you may also consider performing cosmetic reconditioning on items such as the brake calipers, hub hat, etc. Many of today´s large diameter custom wheels feature very "open" designs that reveal brake and suspension components. As a result, many customers may be disturbed to see rusty and/or dirty brake/chassis pieces behind their ultra-expensive custom alloys.
While it may not be your job to detail the customer´s vehicle, it´s best to perform those cleanup jobs that are practical, given cost and time constraints. It´s best to discuss this with your customers. You may find they plan to perform this work on their own, or they may be planning to install new brake components using direct replacements or performance aftermarket parts. For example, a set of anodized or powder-coated calipers may be selected to enhance the see-through wheel design.
[PAGEBREAK]
WHEEL FASTENERS
Closely inspect the wheel fasteners. Too often ignored, the fasteners may be considered the most critical components of the wheel/tire assembly. After all, if the fasteners fail, even the most exotic wheel and ultra-high performance tire can turn into a worthless heap of trash if it separates from the vehicle. Subsequent damage to the vehicle itself and potential injury to occupants also are possibilities.
Whether the vehicle uses lug studs or bolts, inspect the threads for condition and cleanliness. If evidence of thread damage is found, replace the fastener or fasteners.
Taps, designed to create threads in holes, or dies, used to cut threads on bolts or studs, should never be used to "repair" damaged threads. Only specialty thread "chaser" tools should be used for this, since taps and dies, by the nature of their cutting action, tend to remove metal and therefore can create weaker threads when used to "clean" old threads. Since chaser tooling (specifically designed to recondition, or "roll" threads back into shape) may not be common to some shop tool inventories, you´re far better off by simply replacing any suspect threaded fastener.
If performing the replacement means that a hub must be removed in order to replace studs, that´s the price the customer will have to pay in order to do the job correctly.
The strength of the fastener is critical as far as bolt or stud condition is concerned. If the vehicle has been serviced repeatedly using impact tools, especially unregulated impact guns used in lieu of a hand-operated torque wrench, it is very possible the bolts or studs have exceeded their "yield" point.
If over-tightened, the shank length of the bolt or stud may have been stretched beyond its design limit, permanently elongating and weakening the shank. All threaded fasteners are designed to stretch a small amount when tightened to their designed clamping loads (this is referred to as the stud´s or bolt´s elasticity). When the fastener is loosened and this load is released, the shank length should return to its original static length.
Also, the elasticity of the fastener may have been lost, resulting in a substantially weakened fastener. Without very sophisticated measuring equipment -- something no service shop will own -- accurately determining if the bolt or stud has been over-stretched is difficult.
The best approach is to carefully inspect the shank, especially near the base (adjacent to the bolt head or the stud base at the hub). If a slightly smaller shank diameter is seen in one specific spot, this is a clear indication that the fastener has stretched too far and should be replaced. Bear in mind that if you find one stretched fastener, it´s wise to replace all at the same time, since the others have likely experienced the same over-torquing. Considering the relatively low cost of fasteners when compared to the cost of the vehicle and the value of the occupants´ lives, this is a small price to pay for added security.
Another indication of fastener overloading is the ease with which the bolt or nut threads into the hub or onto the stud. For example, if the vehicle features studs, and the nut threads on easily at the outboard end of the stud but begins to dramatically obtain a tighter fit as the nut continues to be threaded onto the stud, this may indicate a deformation of the threads or stretch of the shank.
[PAGEBREAK]
Also, pay strict attention to fastener seat styles to ensure correct mating to the wheels. If the wheel´s fastener seats require a tapered, ball or straight countersunk seat, the appropriate nut (or bolt) seat style must be used. If the seat style of the fastener does not match that of the wheel, it will be impossible to obtain correct clamping, and the wheel will eventually loosen and/or separate from the vehicle.
Never assume that the fastener seat style of a replacement aftermarket wheel will be the same as used on the OE wheel. Always check this before mounting the wheel to the vehicle. By the same token, the aftermarket alloy wheel may feature a different hub thickness, which, depending on fastener type, may require a deeper-reach nut, longer studs or longer bolts.
If the new wheels are packaged with dedicated nuts or bolts, there´s a reason. Always check seat style and fastener lengths to make sure that the attachment system is correct for the specific application.
Should fastener threads be lubricated or installed dry? This issue raises some debate, in terms of final torque values that may be achieved with dry or lubed threads. A good rule of thumb is to make sure that the threads are clean and in good condition, then apply a very thin coating of an anti-seize compound to the threads. This will prevent thread galling and long-term rust/corrosion, making the assembly more serviceable in the long run. It should not have a detrimental effect on final torque values.
Again, we need to emphasize the sparing use of such material. Only a thin film is necessary. Also, consider applying a very thin film of anti-seize compound on the hub face. This will prevent the mating surfaces of the wheel and hub from sticking together.
TIGHTENING THE FASTENERS
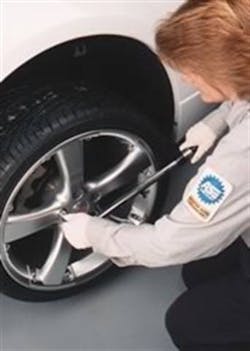
Regardless of the type of vehicle or style of wheel or fastener system involved, one guideline applies across the board: Never tighten wheel fasteners (especially when dealing with alloy wheels) with any tool other than a hand-operated torque wrench. Always tighten in the recommended pattern, and always adhere to the torque value listed in the vehicle service manual. If this practice is followed, fastener damage will be avoided, and the wheel, hub and brake rotor disc should not distort.
Especially considering the common use of lighter weight and thinner rotor hats on today´s vehicles, it is incredibly easy to create brake rotor distortion if a wheel´s fasteners are over-tightened or unevenly tightened. If the rotor hat distorts, the rotor may "warp," resulting in a pulsating brake pedal and a very annoyed customer.
Always tighten any wheel´s fastener group using a crisscross pattern. This means going from one fastener to the fastener located furthest away from the one previous.
Never tighten any fastener group by moving in a sequential clockwise or counterclockwise direction. By staggering the sequence of the tightening, you have the best chance of evenly distributing the clamping load across the hub. Whenever dealing with "lock" type fasteners (wheel locks), the nut or bolt head will feature a unique keyed face. This prevents removal of the fastener with common tools for security reasons. These various styles of specialty key engagements can be damaged easily if you attempt to remove or install the locking fastener with an impact gun. When installing this specialty fastener, take your time to make sure the key is fully engaged, and use the torque wrench to tighten this fastener to the same torque value as the rest of the nuts or bolts. By the way, if a locking type fastener is installed dry, and/or over-tightened, future removal may be difficult. This is yet another reason to very lightly lubricate the threads, to avoid future servicing headaches.
[PAGEBREAK]
WHEEL CENTERING
Depending on the style of the vehicle´s hubs, the wheels may be centered onto the hub by either the group of fasteners (lugcentric) or by the hub center shoulder (hubcentric). If the design features a lugcentric approach, the center of the hub may not feature a raised shoulder flange. In this case, the wheel relies on the group of wheel fasteners to accurately center the wheel onto the hub.
If the design uses a hubcentric approach, the hub face will feature a distinct raised circular flange around the perimeter of the spindle/axle hole. This raised shoulder flange is intended to insert into a circular recess, usually a countersunk receiving area, in the mating face of the wheel hub. This self-centering flange-to-recess fit allows the technician to position the wheel flat against the hub while inserting and tightening the fasteners, with assurance that the wheel is properly centered on the hub.
If however, the wheel is lugcentric, there will be no self-centering aid as seen on a hubcentric design. Instead, the wheel relies on the wheel fasteners to properly center the wheel at the hub.
Regardless of the centering system being used, it´s important to support the tire and wheel while installing the nuts or bolts. If the wheel is hubcentric, as long as the wheel hub face is held flat against the hub, the wheel should remain centered during fastener tightening. If the wheel is lugcentric, it is far more important to support the wheel and tire during initial fastener tightening. This allows the fastener seats to properly engage and center themselves into the wheel´s fastener seats.
Lightly tightening the fasteners (let´s say to approximately 15 or 20 foot-pounds) should provide enough clamping to free-up both hands, allowing you to continue the tightening procedure.
The point is to make sure the wheels are allowed to center properly at the lug positions. If the wheel is allowed to "hang" on the studs while you begin to tighten the first nut, the wheel may approach the hub at a slight angle or at an offset-from-center position. This will create a situation wherein the wheel is being forced into center, which may hinder or prevent the remaining nuts to obtain even/centered engagement in their respective seats.
Simply support the wheel/tire until all fasteners have been initially tightened. If you allow the lugcentric design to do its job, you should encounter no centering problems. Don´t nail the wheel down with one nut and expect the rest of the nuts to "drag" themselves into their individual centers.
Also, always perform the entire fastener tightening job with the tire/wheel off the ground. All too often, do-it-yourselfers and some technicians will initially cinch the wheels lightly, only continuing to torque to value when the vehicle weight is resting on the tires. This should never be done, since vehicle weight now creates enormous pressure that must be overcome during fastener torquing.
The result may be improperly tightened, or improperly centered wheels. The tires should never touch the shop floor, or a lift´s ramp, until all wheel fasteners have been fully torqued to value.
At issue here is a hefty price tag for custom wheels and performance rubber. There´s no reason to slap wheels and tires onto the vehicle in a frenzied racetrack pit situation.
Just as with racing, there´s no reason to settle for second-best, especially when it comes to satisfying your detail-oriented customers.


