SUBJECT VEHICLE: 2008-09 Suzuki Reno.
RELEARN PROCEDURE? Yes.
SPECIAL TOOLS NEEDED? Yes, a T10 TORX screwdriver.
The tire pressure monitoring system (TPMS) on the 2008-09 Suzuki Reno monitors the tire inflation pressure and gives the information of tire inflation pressure to the driver by showing the warning light on the instrument panel.
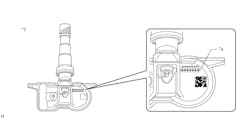
The TPMS consists of four wheel-mounted tire pressure sensor units (TPMS transmitters), a receiver and a warning light. The wheel-mounted sensor unit is an assembly consisting of the pressure sensor, related electronics and power source. The tire valve stem is integrated into the assembly.
When the low tire pressure indicator illuminates, immediately check air pressure of all tires and adjust to the specified pressure. If warning indicators are still on, there is a problem in the TPMS. See appropriate manufacturer service information.
Reset procedures
NOTE: The tire pressure sensor must undergo the learn procedure after a tire pressure sensor or TPMS receiver replacement.
To perform tire pressure sensor registration, the tire pressure sensors can be forced into learn mode using three methods:
The Delta Pressure Method.
The SPX TPMS Tool Method.
The Low Frequency Tool Method.
WARNING: Over-inflating tires may cause personal injury or damage to the tires and wheels. When increasing tire pressure, DO NOT exceed the maximum inflation pressure as noted on the tire sidewall.
1. Turn the ignition switch to the ON position. Apply the parking brake.
2. Using a scan tool follow the prompts and put the TPMS receiver into “LF TOOL” mode.
3. Within two minutes, trigger the left-front tire pressure sensor to transmit a “Learn-Mode-LF Trigger” message. Use one of the methods listed below to trigger the learn mode message.
a. Increase/Decrease Method: Increase or decrease tire pressure by at least 1.2 psi. If the horn sounds, the tire pressure sensor has been registered.
b. SPX TPMS (SPX J-46079) Sensor Activation Tool: Hold the activation tool near the tire valve stem until the horn sounds.
c. Generic Low Frequency (125 KHz) Sensor Activation Tool: Hold the activation tool near the tire valve stem until the horn sounds.
NOTE: The tire pressure sensors should each be registered within two minutes of the preceding sensor. If the two minute time frame is elapsed, the registration procedure will cancel and the procedure will have to be repeated.
[PAGEBREAK]
4. Repeat the procedure for the remaining tires in the following order: right-front; right-rear; left-rear.
5. If the registration of all tires was a success, the horn will sound twice and the TPMS warning light will turn OFF.
6. Turn ignition switch to the OFF position. Adjust all tire pressures to specification.
Demounting/mounting procedures
CAUTION: The tire should be demounted from the wheel using the tire changer manufacturer’s instructions. Use the following information to avoid damage during demounting/mounting procedures.
NOTE: The tire pressure sensors must undergo the learn procedure after a tire pressure sensor or TPMS receiver replacement. See reset procedures.
To remove the tire pressure sensor, follow these steps. CAUTION: Do not inject any tire liquid or aerosol tire sealant into tires, as this may cause a malfunction of the tire pressure sensors. If any tire sealant is noted upon tire demounting, replace the sensor. Also remove all residual liquid sealant from the inside of the tire and wheel surfaces.
Removal
1. Raise the vehicle on a suitable support. Remove the tire/wheel assembly from the vehicle.
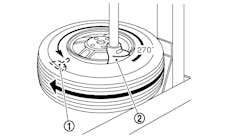
2. Before breaking both beads at 90, 180 and 270 degrees from the valve, make sure the snap-in TPMS is not near the bead buster.
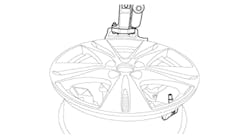
3. Before demounting the tire, make sure the tire pressure sensor is at a 2 o’clock position from the head of the tire changing machine.
4. After removing the top bead, move the tire pressure sensor at the 2 o’clock position from the tire changing machine. Remove bottom bead.
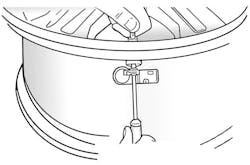
5. Using a T10 TORX screwdriver, remove the TORX screw (see Figure 1).
6. Remove the enclosure from the tire pressure valve (see Figure 2).
7. Using a TTV tool or equivalent tool, remove the tire pressure sensor valve from the wheel hole.
[PAGEBREAK]
Installation
NOTE: Only use the tire pressure sensor valve when the snap-in TPMS part is attached. Make sure the tire pressure sensor valve is installed correctly, before placing the tire onto the rim.
Always use a new snap-in valve and new TORX screw.
1. Using a new TORX screw and snap-in valve, assemble the tire pressure sensor. Use a T10 TORX screwdriver to secure the new snap-in valve to the snap-in enclosure.
NOTE: Do not hold the snap-in enclosure while tightening the screw as this action may lead to over tightening.
2. Hold the tire pressure sensor valve stem and tighten the TORX screw until the tire pressure sensor valve begins to rotate.
3. Apply tire soap solution to the rubber portion of the tire pressure sensor valve and the top part of the tire pressure sensor enclosure. Place the tire pressure sensor inside the wheel hole.
NOTE: Ensure the rubber bulb of the tire pressure sensor valve is resting against the rim, but the face of the tire pressure sensor enclosure is not touching the rim.
4. Using a TTV tool or equivalent tool, pull the tire pressure sensor in a parallel direction to the valve hole axis.
5. Apply tire soap solution to the top and bottom beads.
6. Ensure the tire pressure sensor is at a 3 o’clock position from the head of the tire changing machine before fitting the bottom bead of the tire.
7. To fit the bottom bead, rotate the wheel clockwise until the tire pressure sensor is at the 3 o’clock position from the head of the tire changing machine.
8. To fit the top bead, rotate the wheel until the tire pressure sensor is at the 9 o’clock position from the tire changing machine.
9. Ensure the tire pressure sensor valve core is not fitted and inflate the tire until it passes the bead humps.
10. Attach the tire pressure sensor valve core to the valve stem. Inflate the tire to specified tire pressure values on the placard.
11. Perform the tire pressure sensor registration. See reset procedures. ■
Information for this column comes from Mitchell 1’s “Tire Pressure Monitoring Systems Guide” for domestic and import vehicles through 2012. Headquartered in Poway, Calif., Mitchell 1 has provided quality repair information solutions to the automotive industry for more than 80 years. For more information, visit www.mitchell1.com.


