Today’s uni-body vehicles are considerably lighter and have much stiffer suspension systems than they did just 10 years ago, says Kevin Keefe, vice president of marketing for Hennessy Industries Inc. “Gone are the generous cushions and dampeners that typified the suspensions of yesteryear. Today’s vehicles are more sensitive to vibration than they used to be.
"But in response to overwhelming demand and profit opportunity, the industry continues to equip these vehicles with bigger, heavier and stiffer UHP tire and wheel assemblies. The result is a dramatic increase in road feel and unsprung weight, that is, weight that is not supported by the vehicle’s suspension system. Aside from various effects on vehicle performance, unsprung weight can lead to a harsher ride.”
Just when you think passenger car, light truck and SUV wheels can’t get any bigger, they do, says Keefe. Although not commonplace, 28-inch diameter wheels and tires to match have made headway in the aftermarket. Many OEs are offering UHP tire and wheel upgrade packages, many up to 22 inches in diameter. “You’re dealing with a fixed amount of wheel well space; as the wheels get bigger, the aspect ratios of the accompanying tires get smaller. This means thicker, stiffer sidewalls that are more challenging and time-consuming to mount and demount, and more prone to vibration.”
When evaluating a wheel balancer for UHP needs, Keefe suggests looking at how each balancer deals with static imbalance. “Some balancers will eliminate static imbalance at the expense of a large dynamic residual. Others pay no special attention to static at all, focusing solely on dynamic imbalance. And there are those that deliver the best of both worlds — simultaneous minimization of static and dynamic imbalances. For UHP applications, which are more prone to vibration by nature, your balancing process cannot afford trade-offs.”
Keefe advises dealers to consider a diagnostic balancer. “These machines deliver the balancing features required by today’s ‘power users’ like direct adhesive weight placement, behind-the-spoke balancing, on-board inflation, and real-time graphics and on-board training. They also diagnose other vibration generators common to tire and wheel assemblies such as excess radial runout, excess lateral runout, and excess residual imbalance. Although responsible for about 10% of vibration-related comebacks in general, these conditions are especially troublesome on large, low-profile UHP assemblies.”
A machine’s incremental cycle time for diagnostics can vary greatly between manufacturers. “Quicker diagnostic cycle times not only protect your productivity, but also ensure that your technicians actually use the diagnostic process on every balance, rather than turn it off for the sake of speed, which would defeat the purpose of your investment.”
Choosing the right tire changer and wheel balancer to support your HP/UHP business can be a daunting task, according to Keefe. “Do some basic spec comparisons and you’ll find that you have a wide range of options.”
Here’s a look at new equipment to consider when making a purchase to support UP/UHP mounting and balancing needs.
[PAGEBREAK]
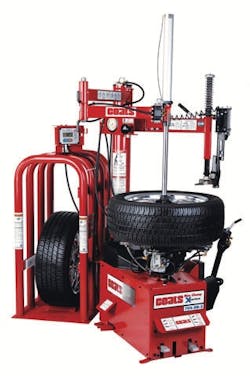
Hennessy Industries recently introduced a leverless tire changer, the Coats 70X, that eliminates the use of manual tire tools and helps improve productivity. An exclusive swing arm-locking mechanism greatly reduces the operator effort required to change even the most challenging applications, according to Keefe. “The 70X Leverless was designed to maximize capability and efficiency across a broad range of tire and wheel fitments, while maintaining Coats’ rugged durability, familiarity and ease of use. The leverless system also delivers increased productivity compared to traditional mount/demount systems.” In addition, Coats introduced an upgrade option for all its tire changers. Designed to reduce bay times, the EL-X Express Lane Inflation System provides time savings of 20% or more on a four-tire ticket compared to the conventional inflation process. In addition to the productivity improvements, the EL-X system is highly accurate, inflating tires to +/- 0.5 psi of desired pressure in order to reduce TPMS-related comebacks, says Keefe.
A new centering system is available from Hunter Engineering Co., according to Greg Meyer, wheel balancer product manager. “BullsEye collets are a new product that is useful in mounting custom wheels. The low taper ensures proper centering, and the taper is ‘split’ to prevent the collet from protruding too far into the wheel and causing damage to trim ring holes or plastic cladding. The new kit consists of 10 collets that handle the smallest wheels up to LT applications. Flange plates, or finger plates, are also valuable in handling custom wheels as they prevent adaptors from contacting the finished surface of the wheel when mounted on the balancer. The Hunter flange plate can handle any rim up to a 160 mm bolt circle and can be set up to handle three to eight lug wheels.”
For mounting and demounting low profile or UHP tires, Pete Liebetreu, tire changer product manager at Hunter, suggests Hunter’s Auto34 and Auto28 tire changers. “The mount/demount head is leverless but also very thin so it doesn’t stress the tire leading to tire damage, machine stalling or wheel damage. In fact, no metal parts get near the wheel at any time during wheel service for the ultimate in wheel protection. It is a center clamping arrangement, so it handles an incredible variety of wheel sizes without special adaptors. Additionally, it uses a rubber-coated cam plate for clamping reverse wheels, so flange plates are not necessary if only servicing occasional reverse mount wheels.”
There is a new class of “premium” tire changers specifically designed for low profile tires and wheels, according to Michael Alusick, worldwide product manager, undercar products at Snap-on Equipment Division of Snap-on Inc. He suggests looking for these five key design elements to identify premium class tire changers.
1. Some type of wheel lifting. The weight and overall diameter of tire and wheel assemblies, especially with larger SUVs and pickup trucks, can make these wheels difficult to lift and position properly without damage (scratching).
2. Center pilot hole clamping. Instead of a traditional turntable with clamping jaws to the rim edge, the wheel is installed through the center pilot hole.
3. Bead breaking using rotating discs. Instead of the traditional single position side bead breaker, the new premium class tire changers use rotating bead breaker discs that engage the top and bottom of the bead when the assembly is rotating. This type of bead breaking is very controlled and less prone to damage the bead or wheel.
4. Bead removal without the use of a standard tire lever. The premium machines use a mechanical “finger” or disc to lift the bead free of the rim edge. No contact of the rim edge during lifting means less chance to damage the bead or rim edge.
5. Topside assist for inflation. A non-traditional turntable with bead seating jets allows a topside air blast nozzle to inflate the tire.
Traditional tire changers are not obsolete, says Alusick. “Quite the contrary, these are still the most popular machines used every day. A good technician can use additional accessories to change high dollar tire and wheel assemblies without damage. It just takes a bit of care.
“There are protectors for the clamping jaws, bead breaker shovel, rim edge, demount tool. There are composite mount/demount heads to replace the traditional steel versions. Some conventional tire changers also have auxiliary handling adapters to press the tire bead pneumatically into the drop center. These devices are especially helpful in mounting low aspect and run-flat tires.
“All these protective devices and special tools allow for safe handling of custom and low profile wheels.”
New equipment also is available for wheel mounting, better identified as wheel tooling, according to Alusick.
“The traditional back cone mounting methods are quite precise for many wheel styles. For today’s high dollar wheels and a new class of wheels called clad wheels, there is special tooling to position the wheel in the rear pilot and also hold the wheel from the front side via pin plates or precision speed plates. These tooling systems achieve precision mounting for successful balance. These mounting systems also guarantee the wheel can be installed on a wheel balancer with no possibility to damage the cosmetic wheel face.”
[PAGEBREAK]
Tips to prevent comebacks
“It’s important to consider road force with all wheels and tires, but especially when dealing with custom assemblies. Road force measurement is required to ensure that all possible causes of vibration have been addressed,” said Hunter’s Meyer. He shares these tips for successful balancing.
• Always “cone” from the back of the wheel whenever possible for best centering results.
• Use collets to achieve optimal centering.
• Use flange plates to prevent damage to the finished portion of the wheel.
• Ensure assemblies are centered on the balancer shaft; on Hunter balancers, the CenteringCheck feature verifies the wheel assembly is mounted correctly.
• Measure road force to eliminate any non-balance wheel/tire vibrations.
Hunter’s Liebetreu says to consider a wheel lift when servicing custom rims and tires. As these assemblies are usually very heavy, injury and fatigue can play a factor in safe servicing. He offers several tips for mounting performance tires and custom wheels.
• Don’t internally clamp, ever.
• Make sure the mount head is clean and free of rust and dirt that might get embedded in the new wheel. The best changers don’t run this risk because of the head design. For traditional changers, make sure the head inserts are in good condition.
• Use a changer with multiple press aids. One pusher arm is not sufficient to mount most custom assemblies.
• Learn the difference between reverse drop center and standard wheels. It can sometimes be difficult to tell, but knowing will make all the difference when servicing these wheels.
According to Snap-On Equipment’s Alusick, much of the equipment in shops is old but quite serviceable for the majority of tires and wheels. “Consider investing in a new generation tire changer and possibly even a high-end diagnostic type wheel balancer. If not these options, research clad wheels for sure. These wheels are becoming the OEM standard. Without proper equipment or accessories you will damage a clad wheel. Consider the cost of replacing a clad wheel, and you will discover you can quickly justify the proper tooling investment.” Alusick’s tips to improve mounting and balancing of UHP tires include having:
• equipment capable of mounting and balancing low profile aftermarket and OEM specialty wheels;
• proper protective accessories for the tire changer; and
• proper tooling for the wheel balancer.
“Look at the wheel and determine if it is steel, cast, chrome or chrome clad before you begin,” he adds.
Hennessy’s Keefe says the best tire service equipment on the market today cannot overcome improper mounting and balancing work methods. He provides these tips.
• Use sufficient lubrication. Insufficient lubrication can result in bead distortion or other tire damage. Conversely, excessive lube or an improper mixture could result in tire slippage. Using the proper amount and type of lubricant for UHP applications is a key factor in reducing variations in the mounting process.
Be sure to apply it to the tire bead and to the bead seat and drop-center areas of the rim.
[PAGEBREAK]
• Take your time when servicing UHP tires. Check for TPMS sensors. Let the top bead relax a little during the mounting process. Use all the helper devices at your disposal. The result will be consistent output of quality work, and less variation in your tire service process. And if you’ve invested in a tire changer with a wheel lift, use it.
“I can hear it already, ‘I’m faster than that lift! My technicians should be able to lift the assembly onto the machine.’ OK, let’s suppose that’s all true. Research shows that most wheel damage occurs while mounting the wheel on the machine. Encouraging, if not enforcing, the use of your wheel lift will save you money on damaged wheels, avoid embarrassing customer situations, and help error-proof your mount/demount process. Plus, it will leave your technicians fresher toward the end of the day, which should improve your productivity.”
Vibration-free rides begin at the balancer, says Keefe. The tire and wheel assembly must be mounted on the balancer in the exact same manner it will be mounted back on the vehicle. “Consider this mathematical fact: A 16-inch diameter, 7-inch wide wheel mounted and balanced just .010-inch off-center on the balancer shaft will result in a .85-ounce static vibration when mounted back on the vehicle. And the balancer, which can only assume that you’ve centered it properly, will gleefully show you zeros. Process errors such as this one are easy to make and are responsible for upwards of 60% of vibration-related tire service comebacks.” The good news, says Keefe, is that vibration-related comebacks are easy to avoid.
First, monitor the condition of your mounting cones and replace them when they begin to appear nicked or worn. “This will remove cone condition as a source of process variation.”
Second, invest in a set of mounting adapters such as pin (flange) plates or fixed finger plates. These adapters engage the wheel in its lug holes, and when used with mounting cones provide an almost error-free method for mounting.
For hub-centric wheels (nearly all OE wheels are hub-centric), the adapters distribute the clamping pressure of the balancer’s hub nut equally around the center hole just like the lugs and lug nuts do on the vehicle and ensure the wheel is centered on the cone. For lug-centric wheels (most aftermarket wheels are lug-centric) the wheels pre-center on the cone, and as you exert clamping force via the hub nut, final centering is achieved on the fingers of the adapter.
“The wheel will be balanced in the same orientation in which it will be mounted back on the vehicle,” says Keefe. “More importantly, it establishes a consistent, reliable process for mounting most any wheel on your balancer.” ■
Has this happened to you? 10 common mounting and balancing problems
What stands in the way of mounting and balancing custom wheels and tires efficiently, quickly, and safely? The long answer is a variety of challenges that boil down to greater risk of sidewall and bead distortion, damage-prone wheel designs and finishes, traditional versus road force balancing, and the heavy weight of tire and wheel assemblies. Many of these challenges are rooted in consumer demands and manufacturing processes.
Modern Tire Dealer asked several equipment manufacturers to share their perspectives on the most common problems related to servicing HP/UHP applications. Admittedly, it’s a broad question with subjective criteria as problems mean different things to different people, especially in an exacting, labor-intensive process like tire and custom wheel mounting and balancing. Greg Meyer, wheel balancer product manager at Hunter Engineering Co., Pete Liebetreu, tire changer product manager at Hunter Engineering Co., Michael Alusick, worldwide product manager, undercar products at Snap-on Equipment Division of Snap-on Inc., and Kevin Keefe, vice president of marketing for Hennessy Industries Inc., participated in our informal poll. MTD compiled and distilled their responses down to the 10 most common problems.
[PAGEBREAK]
1. Most new wheel designs no longer support outer plane clip weights. This requires the use of tape weights, making the weight planes closer together and balancing trickier.
2. Large bore truck wheels often require special adaptors, such as straight-cut discs, to center them.
3. Rims with protruding features on their front face require the mount head to be placed away from the rim, which is a struggle for traditional tire changers. If the protruding features are on a reverse wheel, it is impossible to service safely with tabletop tire changers.
4. Not enough press arms. A single press arm machine can’t even service some 17-inch UHP assemblies without the operator having to use a tire lever as a mounting aid. As the wheel gets larger, the circumference increases and so does the number of bars. The equipment operators only have two arms, so having more on the tire changer is an important feature.
5. Deep drop center wheels can present challenges for mounting and demounting if there is not enough power in the press systems. Some wheels, such as EH2 wheels, are designed with a deep drop center because they are used with run-flat tires. Other wheels are designed with deep drop centers for styling reasons alone.
6. The weight of very large tires on smaller custom rims (such as those used on off-road or raised vehicles) combined with the thick beads can present difficult challenges for traditional levered tire changers. The best higher-end tire changers have leverless systems and lower lifting systems that take the weight of these assemblies out of the picture and allow them to be serviced normally.
7. When using side shovel fixed bead breaker type conventional tire changers, care needs to be taken to position the tire during bead breaking to avoid damaging the TPMS sensor.
8. Premium type tire changers normally hold the tire through the pilot center and offer protection for the clamping nut to avoid metal-to-metal contact during clamping. This capability is especially important for custom painted wheels to avoid any chipping. For clad wheels an additional adapter may be recommended for holding the wheel in place.
9. There is a greater risk of sidewall damage and bead distortion when mounting/demounting UHP tires. Articulating powered helper devices designed to keep the bead in the drop center (a critical requirement in the mount/demount process) are virtually required to service UHP applications. They are critical when mounting low-profile UHP tires on custom wheels that have shallow and/or gently sloping drop centers.
10. The torque generated by a tire changer’s motor (specifically the start-up torque) will determine the likelihood of stalling or jamming the machine when attempting to mount a very stiff top bead, and the ability to successfully back out of it if it happens. Using adequate lubrication as well as allowing the bead to relax during the mounting process will prevent most of these occurrences.
For more 2013 Performance Handbook articles, see:
Performance tire sales: From 50 years ago to 25 years ago to now


