Before cars had electronic controls, most of what went wrong with them was something a technician could see, hear, smell, feel or sometimes even taste (ever sipped coffee next to a car with a coolant leak?).
To find some of the more subtle problems, techs might have used a test light or a vacuum gauge. For really advanced diagnostics they had an engine analyzer with an analog scope as big as a rollaway toolbox that would actually let them see secondary ignition patterns.
Troubleshooting a car today requires knowledge and diagnostic tools that our grandfathers never imagined. We still pay attention to sound and vibration, but most of our clues are gathered electronically and presented as data on a display screen. Imagine how much easier and more accurate our diagnosis could be if we could actually see excess current draw or a plugged catalytic converter or a stuck EGR valve.
Recent advances in thermal imaging technology have made this possible. The technology itself is not new, but the prices are. Today you can buy a useful thermal imaging camera for about half the price of a professional-grade scan tool. It won’t replace knowledge or skill, but it will dramatically reduce the time required to find the problem. Perhaps more importantly, it can provide high confidence in the accuracy of your diagnosis.
Here are some of the more important features of thermal imaging technology, and how they can be used to help your techs.
Background
Everything in the world radiates energy. That’s because molecules vibrate constantly, and those vibrations generate waves of electromagnetic radiation. The physical distance between the waves (wavelength) depends on the amount of energy. When energy increases, the waves become closer together (shorter wavelength).
We actually can see energy that is radiated at wavelengths between 400 and 700 nanometers (billionths of a meter); the color red has the longest wavelength we can see.
The discovery of infrared energy (longer-than-red wavelength) in the early 1800s led to the invention of the first tool for measuring energy in wavelengths that we can’t see: the thermometer. By 1930, a television camera had been developed for the military that could detect infrared energy and display it on a picture tube. Optical sensors developed in the 1980s made the technology portable, and micro-processors developed in the 1990s made it affordable for civilian applications. Today you can buy a consumer-grade pocket-size infrared camera for about $40.Professional-grade thermal imaging cameras started showing up on tool trucks almost 10 years ago, and they were expensive. Today these tools are available over a wider price range, and the price generally reflects the tool’s features and capabilities. Some are well suited to automotive diagnostics, and while they are a significant investment, they are powerful diagnostic tools that can save time and improve the accuracy of a tech’s diagnosis. More and more shops are buying them and using them successfully.
Consumer vs. professional grade
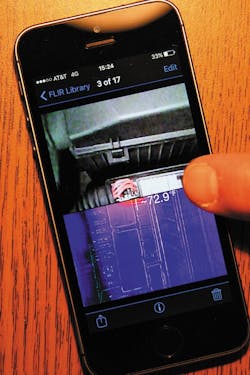
The most basic thermal imagers are consumer-grade models that connect to a smartphone running an Apple iOS or Android operating system. While these do not really compare to professional tools, they provide a low-cost way to explore thermal imaging before committing to a bigger investment, and they do offer some lasting advantages.
First of all, they harness the processing power of the smartphone. While the image itself doesn’t have the resolution of a professional-grade tool, the app offers a wide choice of imaging and display modes such as still, video, zoom, color range, etc. The more useful models have an optical sensor in addition to the thermal image sensor, and the app lets you split the screen to show both the optical and thermal images.
Some of these models overlay a line drawing of the optical image atop the thermal image. It’s still a low-resolution thermal image, but the added detail makes the overall picture more useful.
This same feature is included on some professional-grade thermal imagers. These tools are available over a wide price range, but the least expensive models cost about twice as much as the most advanced consumer-grade imagers.
If you’ve ever used a non-contact infrared thermometer, this tool will seem familiar. Most models project a laser dot that indicates the area being scanned, and the display screen will show temperature data along with the image.
Most models store the image as a jpeg file on a removable SD card, and some also can download the image through a USB connection.The thermal imaging tools sold at places like Home Depot are best suited for industrial technicians or building contractors. They can focus to infinity and some have a visual-light sensor to enhance the image display. What they generally don’t have is a big thermal image sensor. A bigger image sensor captures a more detailed thermal image. The tool’s spec sheet probably lists the pixel size of the display screen, but unless the specs also show the size of the thermal sensor, there is no way to compare it with other tools.
The next step up in price is where you’ll find imagers that are useful for automotive work. Temperature range, accuracy and sensitivity will be more than adequate on all of them. The more important difference from one tool to the next is image display options (zoom, color palate, etc.) that make it easier to detect more subtle temperature differences. The more sophisticated models have an optical sensor and software that adds visible light details to the image.
When comparing thermal imaging tools, the most important specification is the size of the thermal sensor. By its very nature, a thermal image is fuzzy around the edges, and a low-res image can appear as a poorly defined blob of heat energy. A built-in optical sensor provides useful detail, but a bigger thermal sensor provides a sharper thermal image; this is an instance where to a service tech, bigger is better.
Thermal imagers with a really big sensor can cost as much as a scan tool, but there are several models at lower price-points with a good-quality, medium-sized thermal image sensor.
Some thermal imagers come pre-loaded with test procedures and known-good image libraries.Some thermal imagers are made specifically for automotive work. They include built-in software with guided tests and a library of images showing known-good and known-bad components. This can make the tool easier to use right out of the box, and it also can help explain test results to the customer. These are sold through regular tool truck distributors, and some distributors have been known to lend the tool out on a trial basis.
The next step up in price buys a tool that can produce thermal images almost as clear and detailed as a photograph. They are complicated to use and specifically designed for documenting scientific research or industrial inspections. They are also very expensive.
Some of the companies that make these tools also make thermal imagers that are appropriate for automotive work, and they often include some of the same advanced features and image sensors.
Real-world examples
Like all automotive diagnostics, most of the problems a tech can find with a thermal imager also can be found with other tools and techniques. But as noted earlier, a thermal image can visually show the problem, saving time and giving a tech more confidence in the diagnosis. Here’s a good example.
A customer brought in an Acura MDX for repairs because it wouldn’t start in the morning. After being jump-started it would start easily all day, but after sitting overnight the battery didn’t have enough power to start the engine. The tech tested the battery and charging system and found no problems, so he suspected a parasitic draw.
Sure enough, the tech found a 230 milliamp key-off current draw at the battery two hours after turning off the ignition. The maximum should be no more than 75 milliamps after one hour, and on most vehicles it’s less than 50 milliamps. Excess key-off current draw is typically caused by a control unit that remains on or “awake” at all times.
The next step in the diagnosis would be to remove each fuse one at a time to identify the circuit with the high current draw. This can be difficult because the door must be open to access the fuse panel, and simply opening the door activates several control units. To test those circuits, the control units must be disconnected one at a time.
Before starting that task, the tech used a thermal imager to scan under the hood and inside the vehicle with the key removed and the doors closed. On Honda/Acura models, the control unit for the cell phone HandsFreeLink (HFL) is known to sometimes remain active after the ignition is turned off. Sure enough, the thermal image quickly confirmed that control unit was staying on all the time. The tech found this problem without removing the headliner to disconnect the control unit from the circuit.
This Acura cell phone link control unit remained active with the ignition off, draining the battery overnight. Its temperature was only a bit above ambient, but that was enough to confirm the tech’s suspicion without having to remove the headliner to measure current draw on that circuit.
That’s an example of looking for heat energy in places where it should not be. The other obvious technique is to look for heat where it should be, like the exhaust manifold (which cylinder is misfiring?), seat heaters and rear window defoggers (which wire is open?) and even more subtle places like the mass airflow sensor.
With the key on but engine off, a thermal image shows the mass airflow sensor is heating up. That’s not a complete diagnosis, but it’s a non-invasive test that takes only a few seconds and confirms the circuit is working.
Technicians have successfully used a thermal imager to find a dead cell in a battery, a bad idler bearing, a slipping drive belt, a clogged A/C condenser, a clogged EGR valve, a dragging brake caliper, and even to verify wheel alignment by viewing temperature differences across the tire tread after the test drive. Thermal images are also being used as a sales tool. Not only is this a classic case of a picture being worth a thousand words, but showing the customer an image recorded with this impressive technology also gives them confidence in their choice of repair shop.
Learning curve
While the tool itself is simple to use, getting a useful image takes a little practice. Thermal sensors work in real time, but it takes a few milliseconds for the software to convert the signal into an image. Also, most tools automatically adjust the temperature range and color display based on a single point in the center of the image.
With the slight time lag and color adjustment, it can be a challenge to hold the tool still long enough to get a stable image. That’s why most tools have a crosshair on the display screen to help the user keep the image focused on one point.
Sometimes it’s really easy to interpret the image, especially if the tool also provides optical-image details. In this image, the optical sensor provides enough detail to identify individual fuses and relays. The temperature difference is only a few degrees, but it’s easy to see which relay is active.
Interpreting the image also takes practice. A thermal image looks very different from what we see in visible light. That’s why many tools also have an optical sensor, too. The tools also offer different color palates because sometimes the detail shows more clearly in a black-and-white image. Thermal imagers don’t all work the same way, so switching from one tool to another requires a little practice, too. While any thermal imager is useful right out of the box, getting the most out of these tools requires a little imagination.
For instance, sometimes it helps to start with everything at ambient temperature because the temperature difference you’re looking for might be only a few degrees.
The tool is sensitive enough to detect that difference, but it’s just easier to see when everything else is at the same temperature.
Like the scan tool and the oscilloscope, a thermal imager will show things that can’t be seen any other way. If your shop doesn’t have one now, it probably will someday, because the capability it provides is unique.
Imagine the speed and accuracy of a diagnosis when the technician can actually see energy.
That picture is worth more than a thousand words; it’s also worth dollars. ■
Almost X-ray-ted: What you can see with borescopes and inspection cameras
If seeing is believing, then the right picture can save a lot of guesswork. Here’s a photo of a partially melted catalytic converter taken by an inspection camera inserted through the oxygen sensor hole. The catalyst wasn’t clogged and the only symptom was a check-engine light with a catalyst efficiency code stored in the engine control unit.
It takes time and some real skill to diagnose a catalyst code accurately. This picture not only helped the tech feel comfortable with his diagnosis, but also helped convince the customer to buy a new catalytic converter.
The picture was taken with a video borescope, which is an inspection camera that connects to a computer, tablet or smartphone. An inspection camera uses the same technology as a borescope, but it has its own display screen, software and on-board image storage.
Inspection cameras and borescopes have come a long way in recent years. Today you can buy a borescope that connects to an Android tablet or smartphone for less than $15.Of course, these are not professional tools. Whether it’s a camera or borescope, the most important features of the professional tools are the camera size, camera articulation and image size.
Tools designed for automotive work have a camera head that is less than 10 millimeters in diameter, and some are less than 6 millimeters. The lens is focused to produce high-definition, close-up pictures, and the camera head also will have some way to adjust the light level.
The best units have some method of articulating or rotating the camera head. While this feature puts the tool into a higher price category, it dramatically increases the tool’s utility.
When comparing these tools, pay attention to image capture or image resolution specifications. It takes a high-resolution image sensor to capture a clear image of something that’s only one inch from the lens.
Most stand-alone inspection cameras and borescopes offer a photo-zoom feature, but as you know images captured at 640 x 480 pixels will always be clearer than those captured at 320 x 240 pixels.
These tools do not have X-ray vision, but with some imagination and a little practice, it will almost seem like you can see through walls. Inspection cameras and borescopes give you the ability to see inside things without taking them apart.
These tools are not cheap, but the first time you confirm a clogged air conditioner condenser without removing the dashboard or retrieve a dropped bolt without removing the timing chain cover, you’ll appreciate your investment.


