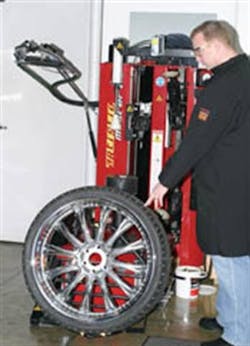
Challenges in mounting or demounting 18- to 26-inch wheel/tire packages involve issues of weight, size and the tire changer's ability to avoid wheel or tire damage.
Larger wheel diameters coupled with w-i-d-e tires makes the package relatively heavy. Plus-sized SUV tire and wheel packages easily can weigh 70 to 100 pounds or so, which means that someone -- or something -- must lift the package onto and off of the changer.
From a shop safety aspect, it's certainly better to have a machine that will do the heavy lifting. The Corghi Artiglio Master is one example, with its hydraulic lifting cradle that can move a package from the floor, into final service position and back to the floor following service. Another example is the Coats 9024 Tire Changer from Hennessy Industries Inc. Hunter Engineering Co. has a wheel lift accessory option available for its TC3250 and TC3500 tire changers.
Machine muscle figures prominently when dealing with short and stiff sidewall/bead systems. Again, the machine should do the hard work for you, without the need to assist with hand-held tire irons.
It's absolutely critical to first study the wheel to verify if the tire is to be serviced from the front or rear. About 50% of today's aftermarket wheels that feature 20-inch or larger diameters are designed with reversed rims. This means that the "attack" side of the rim -- the side to use when removing or installing the tire -- is located on the rear of the wheel. You should look for evidence of the rim's drop area. If you see this on the rear side of the rim, you're dealing with a reversed rim and, therefore, the wheel must be secured "upside down" on the changer. This will require a special hub adapter to properly secure the wheel while avoiding wheel surface damage.
[PAGEBREAK]
If service on a reverse rim is attempted on the front side, you won't be able to complete the job, and chances are very good that you'll severely jam the tire.
Whenever you're dealing with a run-flat type of tire, it's important to recognize that the sidewall/bead area is extremely stiff. Attempting to service a typical run-flat performance tire on an aging tire changer will most likely result in damage to the rim, the tire bead and the operators who try to mount or demount the tire with hand-held irons.
No kidding... you can sustain serious injury by trying to force a run-flat onto or off of a rim. This brings us back to our earlier discussion regarding changing machines. If you plan to service run-flat tires, you need an up-to-date machine that will secure the wheel properly and perform all of the hard work via electric/hydraulic assist.
Performance tires and custom wheels have grown incrementally larger in diameter and width. In addition, today's performance tires feature shorter and stiffer sidewalls.
As a result, your shop must obtain a tire changing machine that will both accommodate today's large dimensions, and do so without damaging either the wheel or tire.
[PAGEBREAK]
Maybe your particular market area doesn't have a high demand for 26-inch or larger wheel diameter behemoths. But considering today's market climate, if your changer can't handle wheel diameters in the 20-inch range and rim widths in the low to mid-teens, you're in trouble.
Because of the large wheel mass and the almost-certainly-stiffer-and-shorter tire sidewall that you'll encounter on a regular basis, the mounting machine needs to stabilize the wheel without gouging the metal or damaging its surface finish (which might involve chrome plating or powder coat paint). To facilitate the relatively stiff tire sidewall, the changer should feature a bead-pusher arm that will push or roll against the bead while avoiding damage to the bead itself. Any guides or spoons that are featured on the machine also should be designed to protect the tire (these might be coated with a smooth polymer).
As we mentioned earlier, a nice feature for any changer is a hydraulic lifting cradle, considering the weight of some large tire/wheel packages. Even if this is an extra-cost option on a machine of choice, seriously consider spending the extra dough.
Match-mounting or phase mounting enables you to orient the tire to the wheel in the most advantageous clock position to minimize out of balance, radial and lateral runout and radial force variation.
Match-mounting lets you optimize the installed package while avoiding the creation of stack-up tolerances between the wheel and the tire. It can be performed by following one of two procedures:
1) aligning the wheel's measured point of lowest runout (the wheel's low spot) to the tire's high spot (where radial force variation would be highest); or
2) aligning the wheel's heavy spot to the tire's light spot for optimum initial balance.
(Radial force variation is not a balance issue. Rather, it refers to vibration/thumping that may occur because of wheel/tire shape under dynamic conditions.)
[PAGEBREAK]
It was once common for low-runout spots or heavy-weight spots to be marked on original equipment wheels, and high-runout (red dot) or low-weight spots (yellow dot) to be marked on OE tires. Today, instead of permanent paint dots, some OE wheels and tires use temporary stickers that are removed by service technicians or fall off on their own.
It was also common practice to consider an aftermarket wheel's air valve location as the appropriate reference for aligning the tire's match mark. However, in many present-day cases, the air valve location is based on wheel appearance instead. So don't rely on being able to use match marks when dealing with aftermarket components.
The most efficient methods to verify proper phase matching require the use of the following:
* a technologically advanced balancing system that will provide accurate dynamic balance results and measure runout; or
* one that is able to measure runout and force variations under load.
At the very least, measure the wheel manually for runout and mark its low spot. If you run into a radial runout stackup after mounting, you can then rotate the tire 180 degrees on the rim for re-checking.
Since radial force variation is present under load, the only way to accurately locate the point of this variation is with a balancer that offers "road wheel" loading.
Whether we're dealing with static or dynamic balance, what we're really attempting to balance is the wheel -- by both mounting the tire in the most favorable location on the rim and by adding any necessary weight to the wheel to cancel opposing mass and forces.
After all, we can't remove or add weight to the tire itself, so our goal is to balance the wheel, in its mounted state.
[PAGEBREAK]
If we only cared to weight-balance a wheel in order to correct its radial weight, we would use a static balance approach. In this method, we would add a counterweight to the wheel rim, at a location 180 degrees from the initial heavy spot of the wheel/tire package. This presumably would cancel out any radial balance issues, since the force of the tire against the road would theoretically be the same at any point along the radius of the tire.
However, all forces don't always remain in the same plane. Since a "vibration" can be generated at the inboard or outboard sides in addition to tread-center, we need to consider the dynamic, or in-use balance condition.
When weight is unequal at either side of the tire (inboard or outboard of the tread centerline), a "wobble" or "shimmy" type of vibration is generated that affects the axial load of the wheel/tire.
Remember: Radial imbalance (static) results in a vertical vibration, or thumping. Dynamic vibration can result from axial loads in addition to radial loads.
The current generation of extremely large wheel diameters and tire/wheel widths really haven't posed any problems regarding balance. In theory, nothing has changed, other than the majority of aftermarket wheels now require adhesive balance weights, and the balancing machines themselves need to be built with a heavy-enough spindle weight capacity to accommodate wheel/tire packages that can very easily tip the scales at over 100 pounds.
[PAGEBREAK]
INFLATION SENSORS: Reprogramming tools may be needed
Once relegated to only Formula One and Indy cars, tire pressure monitoring systems are now moving into mainstream vehicle use. A proposal by the National Highway Traffic Safety Administration mandates them on 100% of all cars starting with the 2008 model year (the final ruling is expected this summer).
These inflation sensors are mounted to the rim, generally incorporating the pressure valve. The sensor is mounted at the wheel's valve hole location.
Whenever demounting or mounting tires, it's important to first know whether or not the vehicles are, indeed, equipped with tire pressure monitoring systems. If so, you need to exercise great care during tire service to avoid damaging the sensors.
Before mounting the tire on a sensor-equipped wheel, closely examine the sensor (and the entire rim and inside of the tire, for that matter) for dirt and other debris that might clog the tiny air orifices featured on the sensor body.
These sensors, depending on make and model, may operate on a specific frequency or may be of the magnetic pick-up type. In some cases, the sensor may be "remembered" by the vehicle's ECU with regard to vehicle position. So if the wheels are rotated, the computer may not properly recognize pressure for a given wheel location. Sensor reprogramming is done with a hand-held tool that can determine the specific frequency, erase a memory, and start the sensor off "fresh" to be correctly identified by the vehicle's management system.
SEATING THE BEADS: Same rules apply to performance tires
Whenever seating beads of any tire onto any wheel, always use a lock-on air chuck that allows hands-free inflation. Also, never stand directly above the assembly during inflation. Lube the tire beads well before mounting and bead seating. Don't exceed 40 psi to seat the beads.
Once the beads pop-on and have seated, take a few moments to carefully examine the bead edges for signs of escaping air. If the mounting lube isn't "watery" enough to produce bubbles, squirt a soapy solution onto the bead area. If you see bubbles that reveal escaping air, it's likely that a burr on the rim is allowing air to escape, or that grit, etc., is trapped between the tire bead and the rim's bead seat. Mark the leak location on both tire and rim, break the bead loose and examine each component for the cause of the leak.


