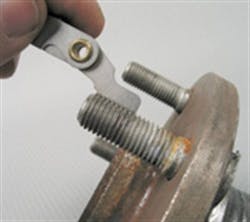
Insurance companies will tell you that the number one claim they receive against automotive repair facilities is the loss of a wheel from a vehicle. They annually pay out huge claims because tire/wheel assemblies are too often improperly fastened to the vehicle.
The result, besides an avoidable accident and loss of trust by your customers, is that you or your company will pay higher insurance premiums. If you properly understand wheel fasteners and implement strict policies for tightening wheels to vehicles, you won´t have problems.
You must know the basics when dealing with fasteners and doing the job right - there´s no excuse for cutting corners.
[PAGEBREAK]
NUTS AND BOLTS
Wheel fasteners, both nuts and bolts, are too often treated as afterthoughts when a customer chooses a wheel. Yet they represent the most important fasteners on the entire vehicle. After all, a wheel´s fasteners represent the only means of attaching the tire/wheel assembly onto the vehicle. As such, they need to be fully understood and appreciated. The nuts that attach a set of custom wheels onto a vehicle are more than decorative items -- they are the vital link that separates safety from disaster. Improper wheel attachment can lead to an inconvenient breakdown at the very least, or a catastrophic tragedy at the worst.
Fastener types, thread geometry, seating styles, installation guidelines, fastener tightening and bolt pattern sequences are some of the basics you must understand to properly install a wheel.
Fastener sizing involves selecting the correct diameter, thread pitch and length for proper thread engagement. Here´s an overview.
1. Diameter. This refers to the diameter of the threaded section of the fastener (outer diameter of a bolt shank or stud, or inner diameter of a nut´s threaded hole). Since it´s easier to physically measure a male threaded section, we´ll focus on studs and wheel bolts.
Size is referred to with a series of three numbers, which indicate thread diameter, thread pitch and thread length, in that order. For example, a 1/2x20x4 indicates a bolt or stud that features a 1/2-inch diameter shank, a thread pitch of 20 (20 threads per inch) and a thread shank length of four inches.
If the fastener is metric, the numbers refer to the same dimensional areas, but are indicated using metric dimensions. For example, a 14x1.5x45 refers to a 14mm thread diameter, a thread pitch of 1.5mm and a thread length of 45mm.
A common mistake some folks make is to incorrectly identify nut or bolt sizes, confusing hex head size with thread size. The size of the fastener (thread area diameter) refers to the diameter of the threaded area (threaded hole in a nut or threaded shank on a stud or bolt). The wrench size required to service the fastener does not indicate fastener size. Neither does the width of the hex head.
If the threaded area is 1/2-inch in diameter, the nut or bolt is a 1/2-inch size, not a 3/4-inch (based on head hex width). When sizing any fastener, ignore the service end (hex head). It´s only the diameter of the thread area that indicates size.
2. Thread pitch. When using an inch format, the thread pitch number indicates the number of threads along a one-inch length of the shank. For example, a 1/2-inchx20-inch wheel stud is 1/2-inch in diameter, and has a thread count of 20 threads per inch of shank length.
When using a metric format, the first number indicates the thread shank diameter in millimeters (12mm, 14mm, etc.). However, metric thread pitch numbers indicate the distance between threads. For example, a thread pitch of 1.25 indicates that the distance between two adjacent threads is 1.25mm. If the thread pitch is 1.50, the distance between threads is 1.5mm.
The last number of a stud or bolt size indicates length. A metric size of 14x1.5x35, for example, indicates a stud or bolt that is 14mm in diameter with a thread pitch of 1.5mm and a shank length of 35mm.
In inch format, the higher the pitch number, the "finer" the threads (more threads per inch of shank length). Whether or not an inch-format fastener is considered "fine" or "coarse" is relative to the thread diameter.
Using a 1/2-inch diameter fastener as an example, a thread pitch of 13 is "coarse," while a thread pitch of 20 is considered "fine." Using a 1/4-inch diameter fastener as an example, a thread pitch of 20 is considered coarse, while a 28 pitch is considered fine. Basically, in inch format, each fastener thread diameter size offers two choices -- coarse or fine. With regard to wheel fasteners, the threads are always "fine." As compared to coarse threads, this provides increased bolt strength and potential clamping load.
If a wheel fastener has a 7/16-inch diameter, the thread pitch will be 20. If it has a 1/2-inch diameter, thread pitch will be 20. If it has a 9/16-inch diameter, thread pitch will be 18.
In metric format, the higher the number, the more "coarse" the thread pitch. For example, a 1.0 pitch is "very fine," a 1.25 pitch is "medium fine," a 1.5 pitch is "medium" and a 1.75 pitch is "coarse." Metric wheel fasteners will either feature a 1.25 or 1.5 thread pitch, regardless of thread diameter.
3. Length. The amount of thread engagement between the stud and nut (or wheel bolt to hub) is critical. At the minimum, thread engagement length must be equal to or greater than the diameter of the fastener. In other words, if the stud is 1/2-inch in diameter, the nut must engage onto the stud by at least 1/2-inch. If not, either a longer stud or longer nut must be used (if a longer nut is needed, the nut must protrude further through the wheel hole to meet the stud). Use of longer nuts is possible when the nut features an extended shank that offers greater thread length. This will vary depending on nut style. If this isn´t feasible, a longer stud must be used.
When using wheel bolts or capped nuts, care must be taken to avoid bottoming the bolt or nut. For example, if the stud offers one inch of exposed length for nut engagement, but the threaded hole in the nut is only 3/4-inch deep, the nut will bottom-out on the stud and will not clamp the wheel against the hub. Pay attention to length, instead of blindly screwing on whatever nuts are handy at the time.
You can accurately identify the thread diameter, pitch and length of any wheel fastener with three readily available tools: a combination bolt/nut sizing card (these are hard plastic and are available to cover both inch and metric sizes) and two thread pitch gauges (one inch and one metric). That´s all you need to quickly and accurately read any wheel bolt or nut without any guesswork.
4. Protecting the heads. A common source of frustration for many installers of custom wheels lies in the potential for fastener head (or adjacent wheel material) scuffing during fastener installation.
A customer who has just purchased a new set of wheels has the right to expect the installer to use extra care in attaching the wheel to the vehicle. Take the time to clean your socket wrench, make sure the socket engages fully onto the fastener hex, and try to avoid jerky movements that might nick or scuff the wheel.
5. Drive style. A wheel nut or bolt provides a means of tool attachment for removal and installation. This will involve a male hex body (for use with a six-point socket), a female hex (for use with a six-point hex bit) or a spline drive that features a series of grooves or splines. A spline drive style requires a special splined socket.
Many of today´s "tuner" style wheels use smaller outer diameter fasteners to accommodate the minimal hub area created by some lightweight wheel styles. A female-hex type nut or bolt allows the use of smaller outside diameter fastener bodies; in comparison, male hex heads (which require the use of larger diameter sockets) would cause a socket tool-to-wheel space problem.
[PAGEBREAK]
6. Emergency removals. How often is a "stuck" fastener encountered that prevents wheel removal? Maybe the wheel is equipped with a locking fastener and the key has been lost. Or maybe the hex head has been "rounded off" through misuse.
Instead of firing up the welder to stick a fresh nut onto the damaged unit, the best approach is to use a specialty socket that features a reverse-twist spiral thread inside the socket. These hardened sockets grip firmly onto the fastener. The more you turn counterclockwise, the harder they bite onto the fastener. Simply place one of these sockets onto an impact gun and walk the bad fastener off. You´ll ruin the outer wall of the offending fastener during removal, but in this type of situation, you already know that it will need replacement anyway.
The bottom line is that you can remove the wheel from the vehicle and get yourself out of a bind.
7. Seat styles. The contact area between the fastener and the wheel is referred to as the "seat." It refers to the surface area where the fastener actually contacts the wheel and where clamping pressure is applied when the fastener is tightened.
It is absolutely vital that the seat style of the fastener matches the seat style of the wheel´s fastener hole entry. The use of incorrect seat styles, even though thread pitch and thread diameter may be correct, can easily result in wheel damage during tightening, and fastener loosening during vehicle operation.
If the fasteners loosen, the wheel will "wobble" as it moves in relation to the hub. Eventually, this movement, or play, will ruin the wheel´s fasteners holes, resulting in either breaking the wheel or complete loss of the tire/wheel assembly. The importance of matching fastener seat style to that required by the wheel is an issue that can´t be over-emphasized.
Do not confuse the style or shape of the fastener head with the shape of the fastener´s seat. If a wheel nut features a radiused head (rounded head), some folks may call this an "acorn" nut. However, others will interpret the term "acorn" as a radiused, or ball-style, fastener seat. Always make sure that you clearly understand the terminology for seat styles.
A variety of seat styles are in use today, and as we´ve already mentioned, the seat style of the fastener (nut or bolt) must match that of the wheel.
Make sure they match: Nix the mixing of conical, radius and mag seat styles
The most commonly employed seat styles include conical, radius and flat ("mag"). These terms refer to the shape of the seat -- where the fastener contacts the entry of the fastener hole in the wheel.
1. Conical. Conical seats also are called "tapered" or "cone" seats. All three terms refer to a seat that features an angled seat wall, where the dimension of the taper is largest at the top, under the head, and tapers to a smaller diameter where the angle meets the rear face of the nut (or adjacent to the threaded shank on a wheel bolt). The most common angle of taper is 60 degrees. The male taper nestles into a tapered relief pocket at the fastener hole entrance.
2. Radius. Radius seats also are called "ball" seats, with good reason. The rear of the nut (or base of the head on a wheel bolt) is rounded into a ball shape. It´s like a ball that is cut in half, with only the radius remaining. The male ball seat fastener contacts the wheel´s female radiused ball relief.
3. Mag. The term "mag" refers to a fastener that features a flat contact at the wheel; it usually includes a thick, flat washer. The generic term "mag" is a holdover from the early days of custom wheels, when magnesium was sometimes used to make lightweight racing wheels.
The mag-style nut also features a smooth outer-walled shank that serves to help center the wheel (the shank drops through the wheel hole, serving as a guide pin to center the wheel´s hole over the hub´s threaded stud). The shank length varies depending on wheel thickness and stud length.
When using a capped nut (where the female threaded hole does not pass all the way through the nut), it´s important to pay attention to thread engagement length. At minimum, you need the stud to engage into the nut at least equal to the stud diameter (if it´s a 1/2-inch stud, thread engagement depth must be at least 1/2 inch). But also be careful not to let the stud bottom out inside the nut. If the stud bottoms out, you won´t be able to achieve full clamping load.
Never mix seat styles. Incompatibility between the seat of the fastener and that of the wheel will cause wheel damage during tightening and will result in eventual wheel loosening. Pay attention to the seat style, and make sure you select the proper style for the wheels to be installed.


