Wheel sizing is a simple matter once you understand the different wheel sizing labels and terms and the methods of measuring wheel dimensions.
TERMINOLOGY
Wheel dimension labels and terms of common use include rim diameter, rim width, backspace, offset and bolt circle.
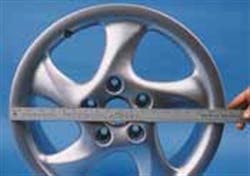
1. Rim diameter is the diameter of the rim´s bead seat floor, not the diameter of the outer rim edge. The rim edge, or lip, extends beyond the bead seat area to capture the bead and prevent the bead from slipping off the rim. If we say that a wheel has a 19-inch diameter, we mean that the diameter of the bead seat floor measures 19 inches. The outer rim edge diameter may actually measure 22 inches or so, depending on the design.
2. Rim width is the distance from the outboard bead seat to the inboard bead seat. Just as with rim diameter, rim width is not measured at the overall width of the wheel (you only should be concerned with the seating width that the wheel offers for the tire beads).
If a wheel is said to be 10 inches wide, the distance between the bead seats is 10 inches. The overall width, measured between the rim outside edges, is immaterial.
3. Backspace is the distance from the rear face of the wheel center (the face that contacts the hub) to the rim´s rear outer edge. In this case, we don´t care about the location of the bead seat. Instead, we do want to know how far the outer edge of the rim extends from the center section´s hub contact face.
4. Offset refers to the location of the center section´s hub contact face, relative to the mid-point of the rim width. The mid-point of the rim width is exactly that: If the rim is 10 inches wide from bead seat to bead seat, the mid-point, or halfway mark, would be 5 inches from either bead seat.
If the wheel center section hub contact face is in-line with the rim´s midpoint, this is "zero" offset. This would place the center of the tire tread in-line with the axle´s hub face.
If the center of the rim is positioned inboard relative to the mounting surface of the hub, this is called "positive" offset (positive offset places the tires on the same axle closer together, creating a narrower track).
If the center of the rim is positioned outboard relative to the hub mounting face, this is called "negative" offset (negative offset places the tires on the same axle further apart, creating a wider track).
5. Bolt circle is simply a way to measure the "layout" of the wheel fastener holes. If we connect all of the fastener holes by drawing an imaginary circle through the center of each hole, the diameter of that circle is the "bolt circle." This might be 4.5 inches, 4.75 inches, 114mm, etc.
[PAGEBREAK]
HOW TO MEASURE A WHEEL
While a wheel can be measured while mounted to a tire and even on a vehicle, don´t put yourself through this level of agony. Remove the tire and wheel from the vehicle and dismount the wheel. Do whatever is needed to reduce the subject to a bare (and clean) wheel.
1. Measuring rim width. The only way to accurately measure rim width is by measuring a bare, unmounted wheel. Using a straightedge ruler or metal tape measuring tool, measure the distance between the two opposing rim flanges from the inside face of the outboard flange to the inside face of the inboard flange, or bead-seat-to-bead-seat.
Do not measure from the outside surface of the rim. We´re only interested in the distance between the two short walls that capture the tire beads.
2. Measuring rim diameter. Using a nice, big caliper would make this job easier. But if your shop doesn´t have a caliper that ranges from 13 inches to 22 inches, here´s a method that´s simple and easy to use.
First, measure the overall diameter of the outboard rim (not in the bead seat, but the actual outer diameter of the lip -- the biggest diameter available to measure). Just make sure the ruler or long straightedge lies directly through the center of the wheel, to capture the outer diameter. Measure this several times to make sure that you´re capturing the largest dimension.
Next, measure the height of the rim lip from the bead seat. With the wheel standing upright, lay a straightedge across the top of the rim, with the straightedge laying on top of both the inboard and outboard rim lips. Then measure the distance from the bottom edge of the straightedge to the bead seat. This is the distance from the lip edge to the bead seat.
Multiply this measurement by two, and subtract the total from the outer diameter measurement. This is simply a sneaky way of measuring the diameter of the bead seat while the rim edge lips are in the way.
For example, if the outer diameter of the rim edge measured 22 inches, and the distance from the top of the lip to the bead seat is one inch, we subtract two inches from the outer diameter, which indicates a 20-inch diameter wheel. The 20 inches refers to the bead seat diameter, and is achieved by deducting the rim lip height.
The wheel needs to be bare (sans tire) in order to measure diameter accurately. Thankfully, most wheels are labeled with rim diameter on the backside of the casting or via a stamping or a label.
If you want a formula for measuring rim diameters, here it is:
Overall wheel diameter
Bead seat depth x 2 = rim diameter
[PAGEBREAK]
MEASURING WHEEL BACKSPACE
Lay the wheel face-down (outer face down) on a padded surface to avoid scratching the wheel. Position a straightedge across the rear rim, at the center of the diameter. The straightedge can be a steel machinist´s straightedge, a yardstick or any straight object that doesn´t bow or distort.
If a yardstick is used, lay the stick on its narrow edge on top of the rim. If you lay it flat, with the broad side on the rim, the yardstick may sag in the middle, which will result in an inaccurate measurement. Whatever you use, bear in mind that it does not need to be incremented in inches or millimeters, since we´re not using that long straightedge to measure anything. We´re only using it to create a straight line from one side of the rim edge to the other.
Using a vertical ruler, measure the distance from the underside of the horizontal straightedge to the center section´s hub mating face. That´s the "backspace" distance, which shows how far inboard the rim will reach relative to the hub face. This measurement is important if you´re trying to determine adequate clearance distance from the back of the wheel rim to the vehicle frame or various suspension parts.
MEASURING WHEEL OFFSET
Once you´ve measured wheel backspace, determining offset is easy. Simply subtract half of the total wheel width from the backspace dimension. This means that you´ll measure the total rim width (outer edge to outer edge, not from bead seat to bead seat), and divide that measurement in half.
For instance, a 10-inch-wide rim (from bead seat to bead seat) might actually measure 10.5 inches or so if measured from outside edge to the opposing outside edge. Half of 10.5 inches is 5.25 inches. This halved number, or 5.25 inches, represents the midpoint of the rim width.
Subtract that half-width rim number from the backspace measurement, and you´ll determine offset.
Here´s an example: Let´s say the wheel features a 4-inch backspace, and the rim´s overall width is 10.5 inches. Subtract 5.25 inches (half of the outer rim width) from 4 inches (the backspace), and you achieve -1.25 (a negative 1.25-inch offset), which will locate the tire centerline 1.25 inches outboard of the hub face.
If the backspace on the same width rim was, say, 8 inches, a positive offset would be achieved because the tire´s tread center would move inboard relative to the hub face. Example: 8 inches minus 5.25 inches equals +2.75 inches (a positive 2.75-inch offset).
[PAGEBREAK]
MEASURING BOLT CIRCLES
As we noted earlier, the bolt "circle" number simply indicates the diameter of an imaginary circle drawn through the center of all of the wheel fastener holes.
Bolt circles may be referred to in either inch or metric formats. Common inch formats include 4.0, 4.25, 4.50, 4.75, etc. Common metric formats include 100mm, 110mm, 115mm, 120mm, 130mm, 140mm, etc.
Rather than making yourself nuts trying to create an imaginary circle that intersects the center of each fastener location, here are a few tips to make the job easier.
* If the wheel or hub features four fasteners, measure from the center of one hole or stud to the center of the opposing hole or stud. In other words, position one hole or stud at 12-o´clock. The bolt circle diameter is the distance from the center of that fastener to the center of the fastener at 6 o´clock.
* If the wheel or hub features five fasteners, position the wheel or hub so that a fastener is at 12 o´clock. Then make a horizontal straight line on the underside of the lower right and lower left fasteners (not through the centers of these two fasteners, but across the bottom edges of the fasteners).
Now measure the vertical distance from the center of the fastener at 12 o´clock to the center of the horizontal line that runs across the underside of the two lower fasteners. By drawing a horizontal line from the underside of the lower right and lower left fasteners, we´re simply locating the imaginary circle´s 6 o´clock position.
* Another way of measuring a five-bolt pattern is to measure from the center of one fastener to the outer edge of the fastener that is furthest away from the first fastener.
If the hub or wheel features six or eight fasteners, measure from the center of one, across the center of the hub, to the center of the opposing fastener.
Of course, to make this job a no-brainer, simply buy a set of bolt circle gauges and start slapping them onto the hub. When you find a match, look at the imprint on the gauge and your question will be answered.
Once you understand how to measure a wheel, and what the dimensional terms represent, it´s easy to accurately measure and identify any wheel.
Plus sizing: Widen the tire, shorten the sidewall, but keep the outer tire diameter the same
Tire and wheel "plus" sizing refers to creating a package that provides a wider tire with a shorter sidewall fitted to a larger diameter wheel that rolls down the road with the same "overall" diameter as the original tire.
This allows you to play with appearance (more wheel face wrapped in lower profile rubber) and performance (shorter sidewalls mean less lateral flex and quicker response, and larger contact patches mean better traction).
The plus-sizing approach has been around for years, and remains a popular and sensible method of road tuning your customer´s car.
1. Plus-Zero. Plus-Zero does not require a change in wheel sizing. But a simple alteration in tire size can result in a wider section width and shorter sidewall. Here´s how:
Using the original wheel diameter, select a tire that features the same outer diameter as the original, but that offers a wider section and lower aspect ratio. Assuming that you have adequate inner and outer fender and suspension clearance, this will provide a fatter contact patch and improved handling without getting "extreme."
2. Plus-One. This combo uses a wheel that is one inch larger in diameter than the original wheel. A tire is then selected that mates to that wheel, but provides the same outer diameter as the OE tire. The result: no change in speedometer reading or ABS sensing, but a shorter sidewall and bigger footprint for superior handling, braking and looks. In other words, more wheel, mated to a lower profile tire, equals cooler vibes.
3. Plus-Two. As the term implies, you choose a wheel that features a diameter two inches larger than that of the OE wheel, and join it with a tire that matches the OE tire´s outer diameter, but provides a much shorter sidewall and more contact patch capacity.
4. Plus-Three and Plus-Four. By now, you get the idea. Depending on the application, you can plus-size to your customer´s heart´s (and wallet´s) delight. Do I hear a Plus-Five?
As an added note, make sure your customers know what they are getting into with Plus-sizing. As they "Plus-up," the tire sidewall shrinks in height. The shorter the sidewall, the less sidewall flex available -- which translates into a potentially stiffer, thumpier ride.
If the vehicle is intended for daily transport on rough, pothole riddled streets and comfort is paramount, advise them to take it easy. Plus-Zero or Plus-One fitments may be just fine for the situation.
But for a successful plus move, make sure the overall tire diameter equals that of the tire originally installed by the car maker. If you can´t match the outer diameter, at least stay as close as you can to avoid inaccurate speed readings and possible interference with anti-lock brakes and traction control systems.
Speaking in general terms, you should be fine if you stay within 2% to 5% of the OEM outer diameter.
Measuring a tire: Work in inches, not metric dimensions
If you want to play the "what if" game to determine what tire size will give you the dimensions your customer wants, there is an easy way to determine tire dimensions. In the following examples, we´ll illustrate a 255/45R18 tire.
1. Convert the metric numbers into inches to make the formulas work. Using the aforementioned tire size, convert the tire´s section width from millimeters to inches:
Section width in millimeters divided by 25.4 = section width in inches.
Example: 255mm section width divided by 25.4 = 10.04 inches.
2. Calculate the tire´s section height in inches by multiplying the section width (in inches) by the aspect ratio.
Example: 10.04 inches x .45 = 4.518 inches (the tire´s section height).
3. Determine the overall diameter with this formula:
Section height x 2 + rim diameter = tire overall diameter.
Example: 4.518 inches x 2 + 18 inches rim diameter = 27.036 inches overall tire diameter.


