Chrysler 2009 Challenger (and Charger)
The tire pressure monitoring system (TPMS) in Chrysler Group LLC’s 2009 Challenger and Charger monitors air pressure in the four road tires (the spare is excluded).
The Base TPMS consists of tire pressure monitoring sensors attached to each road wheel through the valve stem mounting hole, a central receiver module Wireless Ignition Node (WIN), and an indicator lamp. After a sensor has been replaced, the WIN automatically learns and stores the sensor IDs while driving continuously above 15 mph for 10 minutes. The learning sequence will initiate when the vehicle has beenstopped for more than 20 minutes.
To remove and old sensor, follow these steps. NOTE: Wheels and tires are match-mounted at the factory. Before demounting a tire from its wheel, a reference mark should be placed on the tire at the valve stem location to ensure that it is remounted in the original position on the wheel.
1. Remove tire and wheel assembly from vehicle.
2. Demount the tire from the wheel following tire changer manufacturer’s instructions. Pay special attention to the following to avoid damaging the pressure sensor.
3. When breaking the tire bead loose from the wheel rim, avoid using the bead breaker in the area of the sensor (see Figure 2). When preparing to demount the tire from the wheel, carefully insert the mounting/demounting tool 280 degrees +/- 10 degrees from the valve stem, and then proceed to demount the tire from the wheel. Use this process on both the upper and lower tire beads.
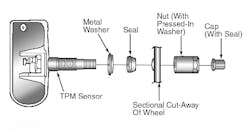
4. Using a thin-walled socket, remove the special nut retaining the sensor to the wheel. While removing the nut, hold pressure against the rear of the metal valve stem to keep the valve stem from pushing rearward, which could damage the antenna strap.
5. Remove the sensor. To install a new sensor, follow these steps. NOTE: Before reinstalling an existing tire pressure sensor, replace the seal and metal washer at the base of the valve stem to ensure proper sealing (see Figure 1).
6. Wipe the area clean around the sensor and valve stem mounting hole in the wheel. Make sure the surface of the wheel is not damaged.
7. Insert the sensor through the wheel, keeping pressure against the rear of the metal valve stem. The potted side of the sensor is to be positioned toward the wheel. Install the sensor nut (with pressed-in washer) by hand. Using a thin-walled socket, install the sensor nut. While holding the sensor in position, tighten the sensor nut to 71 in.-lbs. (8 N.m). CAUTION: Overtorquing the sensor nut by as little as 106 in.-lbs. (12 N.m) may result in sensor separation from the valve stem; the sensor may still function, but the condition should be corrected immediately.
[PAGEBREAK]
8. Mount the tire on the wheel following the tire changer manufacturer’s instructions, paying special attention to the following to avoid damaging the tire pressure sensor.
9. Rotating wheel tire changers: Once the wheel is mounted to the changer, position the sensor valve stem approximately 280 degrees from the head of the changer in a clockwise direction before rotating the wheel (also in a clockwise direction) to mount the tire. Use this procedure on both the upper and lower tire beads.
10. Rotating tool tire changers: Position the wheel on the changer so that the sensor valve stem is approximately 210 degrees from the head of the changer in a clockwise direction from the mounting end of the tool. Make sure the sensor is clear of the lower bead breaker. Rotate the tool in a counterclockwise direction to mount the tire. Use this procedure on both the upper and lower tire beads.
11. Adjust air pressure to specification. Make sure an original style valve stem cap is securely installed to keep moisture out of the sensor. Install the wheel and tire assembly.
12. Drive the vehicle for a minimum of five minutes while maintaining a continuous speed above 15 mph. During this time, the system will learn the new sensor ID code and will clear any DTCs automatically. If a sensor cannot be trained, see the appropriate manufacturer service information. NOTE: If a tire pressure sensor has been replaced, the tire pressure sensors must be retrained.
Now it is time to reset/retrain the new sensor. When diagnosing a tire pressure issue, first check the TPMS indicator lamp in the instrument cluster with the ignition key ON. From the OFF position, turn the key to ON and check the TPMS indicator lamp to observe one of the following:
If after 10 seconds the indicator lamp is illuminating continuously, proceed to Low Pressure below.
If after 10 seconds the indicator lamp flashes on/off for 75 seconds, then remains on solid, there is a system fault detected. See the appropriate manufacturer service information.
Low pressure: If warning indicators are on continuously due to low pressure in one or more tires, adjust tire inflation to specification. The light will remain on until tire pressure is properly set. After adjusting the air pressure in a tire on the vehicle, the vehicle needs to be driven for approximately two minutes above 15 mph for the message or indicator lamp to go out.
Retraining: If a tire pressure sensor has been replaced, the tire pressure sensors must be retrained. After the vehicle has remained stationary for 20 minutes, drive it for a minimum of 20 minutes while maintaining a continuous speed above 15 mph.
During this time, the system will learn the new sensor ID code and will clear any DTCs automatically. If a sensor cannot be trained, see appropriate manufacturer service information.
Information for this column comes from Mitchell 1’s ”Tire Pressure Monitoring Systems Guide” for domestic and import vehicles through 2010. For more information, visit the company’s website at www.mitchell1.com.