TPMS: Toyota Highlander 2008-2017
SUBJECT VEHICLES: 2008–2017 Toyota Highlander and Highlander HV.
RELEARN PROCEDURE? Yes.
SPECIAL TOOLS NEEDED? Yes, a Toyota Techstream.
The tire pressure monitoring system (TPMS) of the 2008–2017 Toyota Highlander and Highlander HV is designed to provide warning when the tire inflation pressure of one or more road tires is low.
A tire pressure warning valve sub-assembly equipped with tire pressure sensor/transmitter is installed in each tire and wheel assembly. The sensor measures the air pressure and internal temperature of the tire. These measured values and the transmitter ID are transmitted to the tire pressure monitor antenna and receiver assembly on the body via radio waves.
This data is then sent to the tire pressure monitor ECU from the tire pressure monitor receiver.
If the transmitter ID has been previously registered, the ECU compares the measured air pressure value and the standard value.
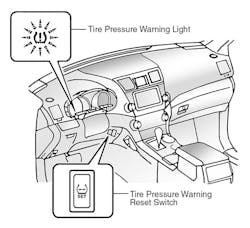
When the value is less than the standard value registered in the tire pressure monitor ECU, the tire pressure warning light on the instrument cluster will turn on.
In order to reset the warning threshold in response to changes in tire pressure values due to tire type and installation position changes, a tire pressure warning reset switch is used. This switch is used to initialize the system after certain repair procedures.
Under the following conditions, the system may not function properly:
- Facilities or devices that use similar radio frequencies are located in the vicinity of the vehicle.
- A radio device of similar frequency is used in the vehicle.
- A film or window tint that may interfere with radio waves is attached on the glass.
- A large amount of snow or ice is stuck to the vehicle, especially onto the wheels and around the wheel wells.
- Use of non-original wheels may result in the system failure or air-leak.
- Tire chains are used.
- Snow tires or tire chains are used.
- If the spare tire is in a location subject to poor radio wave reception.
- If a large metallic object which can interfere with signal reception is put in the trunk.
- When the full-size spare tire is not within the receivable range of the electric wave, a signal may not be received because the full-size spare tire is fixed. Accordingly, the system may not function properly. If there is a possibility that the tire pressure warning system does not receive a signal from the full-size spare tire, rotate the tire 90 to 270 degrees.
- If the system was initialized with tire pressures which were not at the specified values.
Tire pressure monitoring system warning light
NOTE: The tire pressure warning light may turn on due to natural causes such as natural air leaks or tire pressure changes caused by temperature. In this case, adjusting the tire pressure will turn off the warning light.
NOTE: If the warning light turned on due to very low outside temperatures that cause decreases in tire pressure (such as in winter), adjust pressure to a higher pressure suitable to cold conditions. Tire pressure decreases by about 1.45 psi (10 kPa) for every 18 degrees Fahrenheit (10 degrees Celsius) drop in ambient temperature.
NOTE: The compact spare tire is not equipped with the tire pressure warning valve and transmitter. If a tire goes flat, the warning light will not turn off when the flat tire is replaced with the spare. When the standard tire is repaired, inflated to the specified level and returned to the vehicle, the warning light will go out.
When the tire pressure warning light does not go off, or when it comes on during driving, check tire pressure. If the tire pressure warning light comes on after adjusting the tire pressure, the tire may have a slow air leak.
If the warning light is still on even though the tire pressure is correctly adjusted, the tire could be punctured. Repair as necessary.
If the warning light turns on within several hours after adjusting the tire pressure, the tire may have a slow air leak. Repair as necessary. If the warning light is on or blinks after all above situations have been investigated, there is a malfunction in the TPMS. See appropriate manufacturer service information.
Reset procedures
The system will need to be initialized when tires are replaced with tires of different pressures, or the tire pressure sensor and/or tire pressure monitor ECU are replaced. See “Initializing tire pressure monitoring system.” When a tire pressure sensor and/or tire pressure monitor ECU is replaced, the sensor ID must be memorized by the tire pressure monitor ECU prior to system initialization. See “Tire pressure sensor registration.”
When the tire pressure warning light does not go off, or when it comes on during driving, check tire pressure. Adjust tire pressures to specification. Check that the warning light goes out after a few minutes.
NOTE: If the negative battery terminal is disconnected, initialize the following power systems after the terminal is reconnected: window control system, back door system, sliding door system and the moon roof. Refer to the owner’s manual or appropriate manufacturer service information.
Initializing the tire pressure monitoring system
CAUTION: Set tire pressure within the specified range before initializing. DO NOT push the reset switch without adjusting tire inflation pressure of all tires (including the spare tire). Otherwise, the low tire pressure warning light may not come on even if the tire pressure is low, or it may come on when the tire inflation pressure is actually normal. If you push the reset switch while the vehicle is moving, initialization is not performed.
NOTE: The system will need to be initialized when the tires are replaced with tires of different pressures; or the tire pressure sensor and/or tire pressure monitor ECU are replaced. Set tire pressure within the specified range before initializing. When a tire pressure sensor and/or tire pressure monitor ECU is replaced, the sensor ID must be memorized (registered) by the tire pressure monitor ECU prior to system initialization. See “Tire pressure sensor registration.”
NOTE: Perform the tire pressure adjustment after the tires have sufficiently cooled down.
NOTE: The initialization is normally completed within two to three minutes. If the initialization has not been completed successfully, DTC C2177/77 will be set after approximately 20 minutes. Initialization can be terminated by connecting terminals 13 (TC) and 4 (CG) of the DLC3.
During initialization, the tire pressure sensor measures the inflation pressure of the tires, and registers the signals that are transmitted into the tire pressure monitor ECU at a frequency of one per minute. The initialization process is completed when the signals from the tires (including the spare tire) have been received.The initialization process is canceled if the ignition switch is turned to the OFF position prior to the completion of initialization. To restart initialization, the tire pressure warning reset switch must be pressed again.
1) Set the tires to the specified (cold) pressures as indicated on the tire and loading information label.
2) Turn the ignition switch ON.
3) Press and hold the tire pressure warning reset switch for three seconds or more until the tire pressure warning light blinks three times (one second on, one second off). See Figures 1 or 2.
4) Turn the ignition switch OFF.
5) Connect the Techstream to the DLC3.
6) Turn the ignition switch ON.
7) Turn the Techstream ON.
8) Check the data list. Enter the following menus: Chassis / Tire Pressure Monitor / Data List.
NOTE: It may take about two or three minutes until the pressure values are displayed. If the values are not displayed after a few minutes, perform troubleshooting according to the inspection procedure for DTCs C2121/21 to C2125/25. If the initialization has not been completed successfully, DTC C2177/77 will be set after the vehicle is driven for 20 minutes or more.9) Initialization has been completed when the expected tire pressure data for all wheels is on the Techstream display.
Tire pressure sensor registration
NOTE: When a tire pressure sensor and/or tire pressure monitor ECU are replaced, the sensor ID must be memorized (registered) by the tire pressure monitor ECU prior to system initialization. To perform this procedure, the Techstream must be used. It is not necessary to register the sensor ID(s) when only a tire rotation is performed.
NOTE: Before beginning the registration process on vehicles where tire pressure sensors have not been replaced, retrieve sensor transmitter ID(s) using Techstream or by reading the ID on the tire pressure sensor. If the sensor is being replaced with a new one, make a note of the seven-digit number (transmitter ID) before installation, as it cannot be seen after the sensor is installed (see Figure 4).1) Set the tire pressure of all the wheels to the pressure specified on the tire and loading information label.
2) With the ignition switch OFF, connect the Techstream to DLC3.
3) Turn the ignition switch ON. Turn the Techstream ON.
4) To perform the transmitter ID registration, enter the following menus: Chassis / Tire Pressure Monitor / Utility / ID Registration.
5) Input the transmitter IDs (ID1 to ID5) using the Techstream and transmit them to the tire pressure warning ECU.
NOTE: The tire pressure warning light will continue to blink until the tire pressure warning ECU receives the input ID signals.
The previously registered IDs will be deleted from the memory when the registration is completed. Registration can begin while in initialization mode. However, the initialization mode will be cancelled when the registration mode is started.
6) The “ID Registration is Complete” is displayed on the Techstream display.
7) Confirm ID registration through data from all wheels being displayed on the Techstream.
8) Enter the menu items in this order: Chassis / Tire Pressure Monitor / Data List. NOTE: It may take about two or three minutes until the values are displayed.
If the values are not displayed after a few minutes, perform troubleshooting according to the inspection procedure for DTCs C2121/21 to C2125/25.
If the IDs have not been registered, DTC C2171/71 will be stored in the tire pressure warning ECU after three minutes or more. If normal pressure values are displayed, the IDs have been registered correctly. If the tire pressure values are not displayed after a few minutes, the IDs may be incorrect or the system may have a malfunction.
After all IDs are registered, DTC C2126/26 (Transmitter ID not Received in Main Mode) is stored in the tire pressure warning ECU and the tire pressure warning light blinks for one minute and then comes on.
When the tire pressure warning ECU successfully receives radio waves from all the transmitters whose IDs are stored in the ECU, DTC C2126/26 is deleted and the tire pressure warning light goes off.
9) Confirm that the expected tire pressure data of all tires are displayed on the screen.
Demounting/mounting procedures
CAUTION: The tire should be demounted from the wheel using the tire changer manufacturer’s instructions. Use the following information to avoid damage during the demounting/mounting procedures.
NOTE: The system will need to be initialized when tires are replaced with tires of different pressures, and the tire pressure sensor and/or tire pressure monitor ECU are replaced. When a tire pressure sensor and/or tire pressure monitor ECU are replaced, the sensor ID must be memorized (registered) by the tire pressure monitor ECU prior to system initialization. See “Reset procedures.”
NOTE: If the negative battery terminal is disconnected, initialize the following power systems after the terminal is reconnected: window control system, back door system, sliding door system and the moon roof. Refer to owner’s manual or appropriate manufacturer service information.
Tire pressure sensor
CAUTION: The use of tire sealants is strictly prohibited for vehicles equipped with a TPMS. Tire sealants can clog tire pressure sensors.
CAUTION: Be sure to reinstall tire valve caps, or dirt or moisture could get into the valve core and cause air leakage. Use only the original valve cap. If any other valve cap is used, it may corrode or melt, and become extremely difficult to remove.
NOTE: The average life of the grommet of the tire pressure sensor is approximately five years, at which time it must be replaced. If the valve is leaking air, but it is less than five years old and the grommets are in good condition, retighten the valve nut to 35 in.-lbs. (4 N.m). Whenever the tires must be replaced, replace grommets for tire pressure sensors as well.
NOTE: If the tire pressure valve sub-assembly is going to be replaced, make a note of the seven-digit number (transmitter ID) before installation, as it cannot be seen after sensor is installed (see Figure Fig. 4).
Whenever a new sensor is installed, it will need to be registered in the tire pressure monitor ECU.
1) When replacing a wheel or tire, tire pressure sensors must be set up in one of the following ways:
- Remove the sensor from the old wheel and install it in the new wheel. Keep the same wheel with tire pressure sensor, and replace only the tire.
- Use a new wheel and sensor (the new sensor must be registered after installation).
2) Remove the wheel. Remove the cap and valve core, and release air from the tire (see Figure 4).
NOTE: Keep the removed cap, valve core, nut and washer.
3) After ensuring that air is sufficiently released, remove the nut and washer that is used to hold the tire pressure sensor and drop the sensor inside the tire.NOTE: Be careful not to damage the tire pressure sensor due to interference between the sensor and tire bead.
4) After dropping the tire pressure sensor into the tire, disengage the bead using the shoe of the tire remover (see Figure 5).
5) Remove the bead on the upper side following the usual procedure
6) Take out the sensor from the tire, and remove the bead on the lower side following the usual procedure.
NOTE: Check that no cracks or damage are visible on the grommet. If so, replace the grommet together with the washer and nut. Always replace the grommet and washer when replacing the warning valve and transmitter.
7) Remove the inner grommet from the tire pressure sensor, or retrieve it from the wheel, if necessary.
NOTE: The tire pressure sensor is powered by a lithium battery. When a sensor is defective, remove the battery from the sensor and dispose of properly.
Installation
1) Insert the tire pressure monitor valve into the valve installation hole. Insert from the inside of the rim so that the print surface can be seen (see Figure 3). Check for the following:
- Check that there is no visible deformation, damage, or other abnormalities on the tire pressure warning valve and transmitter.
- Check that there is no foreign matter on the inner grommet and around the rim hole.
- If the tire pressure warning valve and transmitter is installed upside down, it may be damaged by the tire bead when the tire is installed, or may fail to transmit signals when the vehicle is driven at high speeds.
- If installing a new tire pressure warning valve and transmitter, write down the ID number before installation (see Figure 3). It will be necessary to register the ID in the ECU after installation.
2) Install the washer on the tire pressure monitor valve from the rim side, and tighten the nut to 35 in.-lbs. (4 N.m). See Figure 6.No further tightening is required once the nut is tightened to the specified torque.
Check that there is no foreign matter on the washer and nut. If the tire and tire pressure warning valve and transmitter have been removed, check that there is no damage or cuts visible, and no foreign matter, such as mud, dirt or sand, is attached to the grommet. Replace the grommet with a new one if any of the defects mentioned above are found.
Check that there is no oil, water or lubricant around the rim hole, tire pressure warning valve and transmitter, washer and nut. Failing to do so may result in improper installation.
CAUTION: If the tire pressure warning valve and transmitter is positioned outside this area, it will interfere with the tire bead, and may cause the tire pressure warning valve and transmitter to be damaged. If the use of lubricant is required when installing the bead, do not apply the lubricant directly to the tire pressure warning valve and transmitter.
3) Put the wheel on the mounting machine, and install the lower tire bead. Position the main body of the sensor in the shaded area as shown in Figure 7.4) Making sure that the tire bead and tool do not interfere with the main body of the sensor and that the sensor is not clamped by the bead, install the upper bead and inflate the tire.
5) After the tire is inflated, the valve nut may be loose. Retighten the nut to the specified torque, and then check for air leaks with soapy water.
6) Install the tire and wheel assembly on the vehicle.
7) When a new sensor is installed, the ID code will need to be registered. See “Tire pressure sensor registration” under “Reset procedures.”
8) After completing the operation, remove the valve core to rapidly release the air in the tire. Ensure that the tire pressure warning light comes on. If the warning light does not come on, refer to the appropriate manufacturer service information. Re-inflate the tires.
9) If there is an air leakage, tighten the tire pressure monitor valve nut to 35 in.-lbs. (4 N.m), and push the valve core two to three times to remove any dirt attached to the valve core. If air continues to leak, replace the grommet, washer and nut. ■
Torque specifications
Component Ft.-lbs.(N.m)
Wheel nut 76 (103)
In.-lbs. (N.m)
Tire pressure sensor nut 35 (4)
Information for this column comes from Mitchell 1’s “Tire Pressure Monitoring Systems Guide” for domestic and import vehicles. Headquartered in Poway, Calif., Mitchell 1 has provided quality repair information solutions to the automotive industry for more than 80 years.
To read more TPMS columns, click:
2008-2017 Nissan Rogue and Rogue Select