TPMS: Acura ILX, MDX, RDX, RLX, TL, TLX, TSX and ZDX – 2007-16
SUBJECT VEHICLES: Acura models covered and model year(s): ILX 2016, MDX 2007-16, RDX 2007-16, RLX 2014-16, TL 2009-14, TLX 2015-16, TSX 2009-14, ZDX 2010-13.
RELEARN PROCEDURE? Yes.
SPECIAL TOOLS NEEDED? The Honda Diagnostic System (HDS) or an OBD-II compatible scan tool.
With the Acura models listed, whenever the engine is running, the tire pressure monitoring system (TPMS) control unit continuously monitors all four tires and the system.
The system has seven indicators: four tire indicators, a low pressure indicator, a message indicator and a TPMS indicator. If the TPMS control unit detects pressure below the lower limit, it alerts the driver by turning on the low pressure indicator, turning on the appropriate tire(s) indicator on the multi-information display as well as the message indicator, and setting a diagnostic trouble code (DTC) in the control unit.
When the tire pressure is increased to normal the control unit will turn off the indicators and store the DTC(s). When two or more tire pressures are low, the low pressure indicator comes on about five seconds before the appropriate tire indicator. Once low pressure is detected, the system scans all four pressure sensors to ensure that it turns on the correct tire indicator. If a problem is detected in the system, the TPMS indicator will come on. If low tire pressure and a problem in the system are detected, only the TPMS indicator comes on.
When the system detects a problem, the TPMS control unit sets a code, but shifts to fail-safe mode, and does not alert the driver to low tire pressures. If the TPMS control unit loses power or fails, the TPMS indicator will come on, but no DTC will be set.
Tire pressure monitor warning indicators
NOTE: If a flat tire is replaced with the spare tire, and the flat tire is stored in the cargo area, the low pressure indicator will stay on but the appropriate tire indicator will go off. This prevents the customer from thinking there is a problem with the spare tire. When the flat tire is taken out of the vehicle for repair, the warning light will come on because the system is no longer receiving the signal from the tire’s transmitter.
NOTE: If the temperature drops and then rises, tire pressure could decrease just enough to turn on the low pressure and tire(s) indicators, but later increase enough to turn them off. This can be an indication that tires pressures are near the minimum acceptable specification.
NOTE: If the outside temperature is at or below -40 degrees Fahrenheit (-40 degrees Celsius), the system may not function properly.
If the TPMS control unit detects pressure below the lower limit, it turns on the low pressure indicator and the appropriate tire indicator(s) on the multi-information display, as well as the message indicator. When the tire pressure is increased to normal the control unit will turn off the indicators.
When two or more tire pressures are low, the low pressure indicator comes on about five seconds before the appropriate tire indicator. If a problem is detected in the system, the TPMS indicator will come on.If low tire pressure and a problem in the system are detected, only the TPMS indicator comes on.
When the system detects a problem, the TPMS control unit sets a code, but shifts to fail-safe mode, and does not alert the driver to low tire pressures. If the TPMS control unit loses power or fails, the TPMS indicator will come on.
If low tire pressure indicator and multi-information display indicator(s) are lit continuously due to low pressure in one or more tires, adjust tire inflation to proper pressure as indicated on the tire and loading information placard.
The light will remain on until tire pressure is properly set. If the warning light is still illuminated or the TPMS indicator is lit continuously, there is a problem in the TPMS. See appropriate manufacturer service information.Reset procedures
NOTE: When a tire pressure sensor is replaced or tires are rotated, the sensor ID must be memorized by the TPMS control unit. See “Memorizing sensor ID (automatically).” If the TPMS control unit has also been replaced, the Honda Diagnostic System (HDS) or an OBD-II compatible scan tool must be used to program information into new TPMS control unit. See “Memorizing sensor ID (using HDS).”
NOTE: Misalignment of the control unit and initiators could interfere with sending and receiving signals. Ensure the brackets on the TPMS control unit and front initiators are not bent.When the tire pressure warning light illuminates and a warning message appears, immediately check air pressure of all tires and adjust to the specified pressure. Ensure that the warning indicators go out.
Tire pressure sensor registration
NOTE: To ensure the control unit memorizes the correct ID, the vehicle with the new sensor must be at least 10 feet from any other TPMS tire pressure sensor not installed on that vehicle.
Memorizing sensor ID (automatically)
1) After rotating the tires or replacing a tire pressure sensor, drive the vehicle for at least 40 seconds at a speed of 15 mph (24 km/h) or more, and all the sensor ID(s) will be memorized automatically.
2) After the ID(s) are memorized, reduce the pressure in all four tires to less than the appropriate specification, and check to see that the four tire indicators come on.
Memorizing Sensor ID (Using HDS)
1) With the ignition switch in the OFF position, connect the HDS to the 16-pin data link connector (DLC) located under the left side of the dashboard.
2) Turn the ignition switch to ON position, and memorize the ID of the tire pressure sensor by following the screen prompts on the HDS. If all ID(s) are memorized properly, go to step 4. If the TPMS control unit fails to memorize one or more sensor ID(s) during the learning process, go to the next step.
3) If one or more ID(s) fail to learn, causing DTC(s) to set, the HDS will provide a procedure to fix this that involves raising the vehicle. To solve this problem much faster, perform the following:
- Using HDS, clear all DTC(s). Using an assistant, start the learning process while driving the vehicle under 10 mph.
- TPMS control units should now learn all four sensor ID(s). If the TPMS control unit is still having trouble learning ID(s), refer to appropriate service information.
4) After the ID(s) are memorized, reduce the pressure in all four tires to less than the appropriate specification, and check to see that the four tire indicators come on.
Demounting/mounting procedures
CAUTION: The tire should be demounted from the wheel using the tire changer manufacturer’s instructions. Use the following information to avoid damage during the demounting/mounting procedures.
NOTE: When a tire pressure sensor is replaced or tires are rotated, the sensor ID must be memorized by the TPMS control unit. See “Reset procedures.”
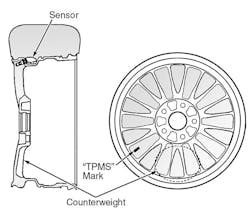
NOTE: Vehicles equipped with TPMS must use wheels made for the system, or the system will not work. The original equipment wheels have a “TPMS” mark on them, and a counterweight cast into the opposite side of the spoke to balance the weight of the sensor (see Figure 1).Tire pressure sensor
CAUTION: Fluid sealant used to repair a punctured tire can damage the tire pressure sensor mounted on each wheel. It can prevent the system from detecting the correct tire pressure and set a DTC even though the system is normal.
CAUTION: On some earlier models, valve stem nuts are made of aluminum. These caps can corrode and become difficult to remove, especially in areas of the country where road salt is commonly used in winter. Aluminum valve stem nuts should be replaced with plastic tire valve caps from the manufacturer (Acura Service Bulletin 05-045; Nov. 11, 2005).Removal
1) Raise the vehicle, and support it with safety stands in the proper locations.
2) Remove the wheel with faulty sensor.
3) Remove the tire valve cap and valve core, and let the tire deflate.
4) Remove any balance weights, and then remove the tire from the wheel with a commercially available tire changer. Note these items to avoid damaging the tire pressure sensor:
- Do the outside of the wheel first. Position the wheel as shown so the valve stem is 90 degrees from the bead breaker (see Figure 2).
- DO NOT position the bead breaker of the tire changer too close to the rim. Position the wheel so the tire machine and tire iron are next to the valve stem, and will move away from it when the machine starts. Then remove the tire from the wheel (see Figure 3). 5) Remove the valve stem nut (A) and the washer (B), and then remove the tire pressure sensor with valve stem (C) from the wheel (see Figure 4).
NOTE: The valve stem grommet might stay in the wheel; make sure to remove it.
6) Remove and discard the valve stem grommet (A) from the tire pressure sensor (see Figure 5).Installation
NOTE: Always use a new valve stem grommet whenever the tire pressure sensor has been removed from the wheel.
1) Before installing tire pressure sensor, clean the mating surfaces on the sensor and the wheel.
2) Install the tire pressure sensor (A) and the washer (B) to the wheel (C), and tighten the valve stem nut (D) finger tight. Make sure the pressure sensor is resting on the wheel (see Figure 6).
CAUTION: Do not use air or electric impact tools to tighten a valve stem nut.3) Tighten the valve stem nut to the specified torque while holding the tire pressure sensor.
4) Lube the tire bead, and position the wheel so the tire machine and tire iron are next to the valve stem and will move away from it when the machine starts. Then install the tire onto the wheel (see Figure 3).
NOTE: Make sure the tire bead is seated on both sides of the rim uniformly.
5) Inflate the tire to 44 psi (300 kPa) to seat the tire bead to the rim, and then adjust the tire pressure to specification as indicated on the tire and loading information placard, and install the valve stem cap.
6) Check and adjust the wheel balance, then install the wheels to the vehicle. Remove the safety stands, and lower the vehicle.
7) Memorize the pressure sensor ID(s). See “Reset procedures.” ■
Headquartered in Poway, Calif., Mitchell 1 has provided quality repair information solutions to the automotive industry for more than 80 years.
For more information, visit www.mitchell1.com.
For more TPMS articles, click:
GM/Cadillac Escalade Series: 2007-16
Ford Expedition, Lincoln Navigator 2011-2016