Navigating the Matrix
SUBJECT VEHICLE: 2008-09 Toyota Matrix.
SENSOR IN TIRE? Yes.
RESET PROCEDURE? Yes (whenever a sensor or the tire pressure ECU has been replaced).
SPECIAL TOOLS NEEDED? Yes (Techstream tester).
The 2009 Toyota Matrix’s tire pressure monitoring system (TPMS) contains sensors that are installed in each tire and wheel assembly. The sensors send air pressure data to the tire pressure sensor antenna and receiver assembly. This data is then sent to the tire pressure monitor electronic control unit (ECU), which compares the measured air pressure with the specified pressure.
If the recorded value is less than the specified value, the tire pressure warning light on the instrument panel will turn on.
In with the new
Before you can replace an old sensor, you have to demount the tire and wheel assembly. Note that installed tires must be of the specified size in order for the TPMS to function properly. Follow these steps to remove the old sensor:
1. Remove the wheel. Then remove the valve core and cap and release the air from the tire. Keep the core and cap.
2. Remove the nut and washer that are used to hold the tire pressure monitor valve sub-assembly. Drop the sensor inside the tire.
3. Disengage and remove the bead on the upper side. Check that no cracks are visible on the grommet.
4. Take the sensor out of the tire.
5. Remove the bead on the lower side.
6. Dispose of the sensor by removing its back cover with a flathead screwdriver and cutting the two battery terminals.
Now you’re ready to install the new sensor. Here’s how:
1. Insert the tire pressure monitor valve into the valve installation hole. Insert from inside the rim so that the print surface can be seen.
2. Check that there is no visible deformation or damage on the transmitter.
3. Check that there is no foreign matter on the inner grommet and around the rim hole.
4. Write down the new sensor’s ID number. It is necessary to register the ID in the ECU after installation.
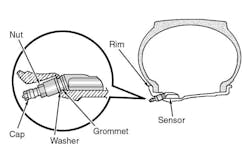
5. Install the washer on the monitor valve from the rim side. Tighten the nut to 35 in.-lbs. (see Figure 1).
6. Check to make sure there is no oil, water or lubricant around the rim hole, monitor valve, washer and nut. Failing to do so may result in improper installation.
7. Inflate the tire. If the valve nut loosens, retighten it to the specified torque. Check for air leaks.
8. Put the wheel on the mounting machine. Install the lower tire bead. Make sure the bead and tool do not interfere with the main body of the sensor and that the sensor is not clamped by the bead.
9. Install the upper bead.
10. Install the tire and wheel assembly.
At this point, you’re ready for the next step: sensor registration.
[PAGEBREAK]
Memorize and register
Whenever a sensor or the tire pressure monitor ECU has been replaced, the sensor ID must be memorized and registered. To do this, you must use a Toyota intelligent tester, the Techstream.
Follow this procedure:
1. Set the tire pressure of all wheels to the pressure specified on the tire and loading information label.
2. Turn the ignition switch OFF and apply the parking brake.
3. Connect the Techstream to the DLC3 and turn the tool on. Turn the ignition switch to the ON position.
4. Select “Chassis.”
5. Select “Tire Pressure Monitor.”
6. Select “Utility.”
7. Select “ID Registration.”
8. Perform the procedure displayed on the scan tool.
9. Confirm the tire pressure sensor’s IDs have been registered.
10. Repeat steps three and four. Select “Data List.”
11. Confirm that the tire pressure values are displayed for all four tires.
12. Confirm that the tire pressure warning indicator is not illuminated.
Remember that tire pressure IDs which were previously registered will be deleted from the system’s memory when registration is completed.
System initialization
Servicing the Matrix’s TPMS requires an additional procedure: initialization of the TPMS. Initialization is required after the replacement of the tire pressure warning valve/transmitter and/or the tire pressure warning ECU. Here’s how to do it:
1. Turn the ignition switch to the LOCK position. Apply the parking brake.
2. Connect the Techstream scan tool to the DLC3. Turn the tool on and turn the ignition switch to the ON position.
3. Press and hold the tire pressure warning reset switch until the tire pressure warning light blinks three times at one-second intervals.
4. Turn the ignition switch to the LOCK position, then the ON position.
5. Using the scan tool, select “Chassis.”
6. Select “Tire Pressure Monitor.”
7. Then select “Data List.” If all of the tire pressure values are displayed, the initialization process has been completed.
8. Set the tire pressure to specified levels.
There are several circumstances that will cause the tire pressure warning light to stay on. Here are some of them: if tires not equipped with tire pressure warning valves and transmitters are used; if the ID code on the valve is not registered properly; if electronic devices using similar radio waves are nearby; if a radio set at similar frequencies is used in the vehicle; if a window tint impedes transmission of the radio signal; if there is a lot of snow and ice on the vehicle, especially around the wheel; if non-genuine wheels are used; and if tire chains are in use. ■
Information for this column comes from Mitchell 1’s ”Tire Pressure Monitoring Systems Guide” for domestic and import vehicles through 2009. Headquartered in Poway, Calif., Mitchell 1 has provided quality repair information solutions to the automotive industry for more than 80 years. For more information, visit www.mitchell1.com.