Calm the clunk in a Nissan caliper
SUBJECT VEHICLE: 2001-2002 Nissan Maxima (built between Nov. 27, 2000, and Sept. 20, 2001), Sentra, Sentra SE (with rear disc brakes built after March 1, 2001) and Sentra SE/R and SPEC V (built before Dec. 3, 2001).
COMPLAINT: A clunk, knock or rattle may be heard from the rear of the vehicle while driving on rough road surfaces or over harsh bumps.
CAUSE/SOLUTION: The condition may be caused by the brake pads moving in the brake caliper housing. A replacement spring retainer kit is available to correct the condition.
The owner of a Nissan Maxima or Sentra may complain of a clunk, knock or rattle noise from the rear of the vehicle while driving on rough road surfaces or over harsh bumps. The condition may be caused by the brake pads moving in the brake caliper housing.
A replacement Spring Retainer (SPR-RET) Kit (PN 44080-4U027), consisting of replacement pad retainers, inner and outer shims and brake pads is available to address this condition.
Repair procedure
1. Test drive the vehicle under the conditions described above to confirm the symptoms exist.
NOTE: Lightly apply the parking brake while the incident is occurring to verify if the noise is reduced or eliminated.
If application of the parking brake does not reduce or eliminate the noise, this information does not apply. Use other appropriate diagnostic procedures and service information to further investigate and diagnose the source of the noise.
If application of the parking brake reduces or eliminates the noise, proceed to step 2 below.
2. Remove the rear wheels, starting with the left.
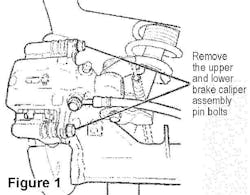
3. Remove the brake caliper assembly pin bolts (Figure 1).
4. Loosen the parking brake cable by removing the parking brake cable bolt.
5. Remove the brake caliper assembly to gain access to the brake pad, shim and pad retainer. Don’t allow the brake caliper assembly to hang from the brake hose. Using wire, hang it from the rear coil spring.
[PAGEBREAK]
6. Remove the left brake pad, shim and pad retainer. Use a suitable brake cleaner to remove old disc brake grease residue and/or brake dust from the “torque member.”
7. Install a replacement pad retainer. Remove the red plastic tabs from one of the replacement pad retainers in the SPR-RET kit mentioned earlier.
8. Repeat step 7 for the other replacement pad retainer.
9. Install inner and outer brake pads, outer shim and new inner shim from the SPR-RET Kit.
NOTE: Apply a suitable high temperature disc brake grease between the brake pad and shim, and between the shim and piston, to reduce potential noise. Use it sparingly. Do not get any grease on the brake pad “friction” surfaces. Be sure to put the inner and outer shims in the correct location.
10. Carefully push the piston back into the brake caliper body while gently turning the piston clockwise.
WARNING: Do not try to force the piston back into the brake caliper. Caliper damage may result.
11. Reinstall the brake caliper assembly to its original location.
12. Reattach the left upper and lower caliper assembly pin bolts. Torque the bolts to proper torque specifications: 16-23 ft.-lb. (22-31 N-m, 2.2-3.2 kg-m).
13. Reinstall the parking brake cable bolt.
14. Repeat steps 3 through 13 for the right rear brake.
15. Reinstall the rear wheels. Evenly torque the wheel lug nuts to the proper torque specification.
16. Test drive the vehicle and verify the noise is no longer present. ■
Writer Jeff Webster. Dorowski has 19 years of domestic and import dealership and independent shop experience as a service consultant, ASE Certified Master Technician, Nissan Certified Master Technician, and California Smog Test and Repair Technician. Webster has 20 years of experience as a writer/editor. The database is provided by ALLDATA, a registered trademark of ALLDATA LLC, a corporate division of AutoZone Inc. The company’s Web site is www.alldata.com.
