Amazing Expedition
SUBJECT VEHICLE: 2009 Ford Expedition.
SENSOR IN TIRE? No (mounted on wheel).
RESET PROCEDURE? Yes (whenever a new sensor has been installed).
SPECIAL TOOLS NEEDED? Yes (TPM Activation Tool 204-363).
The 2009 Ford Expedition’s tire pressure monitoring system (TPMS) uses wheel-mounted tire pressure sensors that send information to the vehicle’s Smart Junction Box (SJB) once every 60 seconds when the vehicle is moving at speeds in excess of 20 mph.
If pressure levels drop too low, the SJB sends a message to the instrument cluster. The low pressure light then comes on.
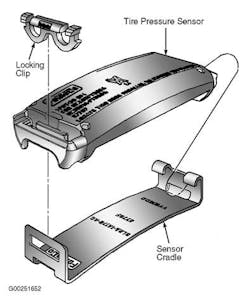
Sensors are battery-operated and are mounted to metal brackets (also called cradles) on the wheels inside the tires. The sensors are mounted 180 degrees from the valve stem.
Sensor swap
Before you can service the Expedition’s TPMS, you must first demount the tire from the wheel using the tire changer manufacturer’s guidelines. Keep in mind that the tire and wheel must always be correctly matched.
Use only wheels and wheel nuts that have been designed for current model year Ford trucks. Tire pressure sensors are not engineered to be used with aftermarket wheels, which may not fit or function properly.
Ford advises using Digital Tire Gauge (204-354) any time tire pressure levels are measured to ensure that accurate measurements have been taken.
When installing a new sensor, make sure the color of the sensor being installed matches the color of the sensor that has been removed. Do not mix-and-match different colored sensors.
Also bear in mind that the sensor is mounted to the rim 180 degrees opposite the valve stem and is held in place by a stainless steel strap. Valve-mounted and strap-mounted sensors are not compatible. Follow these steps to demount the tire:
1. Remove the tire and wheel assembly.
2. Position the assembly on the tire machine with the valve stem at the 6 o’clock or 12 o’clock position. Separate both beads. Index mark the valve stem and weight positions.
3. Demount the tire from the rim.
4. Using a pocket screwdriver, remove the sensor locking clip.
Detach the sensor from the cradle and remove the sensor. Do not use excessive force.
Now you’re ready to install the new sensor. Follow these steps:
1. Position the sensor into the cradle by inserting the hinge end of the sensor into the hook end of the cradle (see Figure 1). Push the opposite end of the sensor down into the cradle. Ensure the sensor has been fully seated.
2. Insert a new locking clip into the sensor.
3. Place the wheel on the turntable of the tire machine so that the sensor is at the 6 o’clock position and the valve stem and machine arm are at the 12 o’clock position.
4. Lube and mount the tire onto the wheel starting at 90 degrees from the sensor.
5. Inflate the tire to the specified pressure and install the tire and wheel assembly.
Now it’s time to train the new tire pressure sensors you have installed.
[PAGEBREAK]
Training time
Whenever a new sensor has been installed, it will need to be trained using a TPM Activation Tool (204-363). Training must be done in an area without radio frequency noise and at least three feet away from any other vehicles equipped with TPMS.
New sensors are shipped in the OFF mode and must be turned ON before they can be trained.
To turn the sensor ON, inflate the tire to the recommended pressure and wait at least two minutes. Then continue with the sensor training process:
1. Turn ignition to the OFF position, then press and release the brake pedal.
2. Turn ignition from OFF to the RUN position three times, ending in the RUN position. Do not wait more than one minute between each key cycle.
3. Press and release the brake pedal.
4. Turn ignition to the OFF position.
5. Turn ignition to the RUN position three more times, ending in the RUN position.
6. The horn will sound once and the tire pressure warning light will flash if you have entered train mode successfully. You will see a message that says “TRAIN LF TIRE.”
7. Place the Activation Tool on the left front tire wall opposite the valve stem.
The horn will sound briefly to let you know the sensor has been recognized.
8. Within two minutes of hearing the horn, place the tool on the right front tire wall opposite the valve stem. Repeat for the right rear and left rear tires.
9. When the training process has been completed, the message center will say “TIRE TRAINING MODE COMPLETED.” For models not equipped with a message center, completion will be verified by turning the ignition switch OFF without the horn sounding.
If you hear the horn when the ignition is OFF, the training procedure was unsuccessful.
Remember that the Expedition’s TPMS may not function properly under the following conditions: the sensor is missing or damaged; sensors have been incorrectly installed; non-OEM wheels are in use; non-OEM equipped run-flat tires are being used; and the vehicle’s spare tire is being used as a road wheel. ■
Information for this column comes from Mitchell 1’s ”Tire Pressure Monitoring Systems Guide” for domestic and import vehicles through 2009. Headquartered in Poway, Calif., Mitchell 1 has provided quality repair information solutions to the automotive industry for more than 80 years. For more information, visit www.mitchell1.com.
