Sky's the limit
SUBJECT VEHICLE: 2008-09 Saturn Sky.
SENSOR IN TIRE? Yes (in each tire/wheel assembly).
RESET PROCEDURE? Yes (whenever a sensor or the Remote Control Door Lock Receiver has been replaced).
SPECIAL TOOLS NEEDED? Yes (TPMS Sensor Activation Tool J-46079), depending on the sensor ID reset procedure you decide to use.
The tire pressure monitoring system (TPMS) in the 2008-09 Saturn Sky contains several components: a Body Control Module (BCM), Instrument Panel Cluster (IPC), Driver Information Center (DIC), Remote Control Door Lock Receiver (RCDLR), a radio frequency transmitting pressure sensor in each tire/wheel assembly, and a serial data circuit.
When the vehicle is stationary, the sensors go into stationary mode. In this mode, sensors sample tire pressure levels once every 30 seconds and only transmit if pressure levels change.
As the vehicle’s speed increases, the sensors go into drive mode and transmit once every 60 seconds. Each sensor takes a measurement sample continuously. If a tire’s pressure increases or decreases by more than 1.2 psi, the sensor will transmit. The RCDLR receives and translates the data contained in each sensor transmission. It then sends tire pressure data and tire location data to the DIC.
When the TPMS detects a significant loss of pressure, a “CHECK TIRE PRESSURE” warning light will appear on the DIC. The low tire pressure warning indicator will be displayed on the IPC.
The RCDLR has the ability to detect malfunctions within the TPMS. Any malfunctions will cause the DIC to display a “SERVICE TIRE MONITOR” message.
[PAGEBREAK]
Off and on
Before you can exchange an old sensor for a new one, you must demount the tire from the wheel. Follow these steps:
1. Remove the tire and wheel assembly from the vehicle.
2. Demount the tire from the wheel following the tire changer manufacturer’s instructions. Make sure you place the tire pressure sensor’s cap on a dry, clean surface after removal.
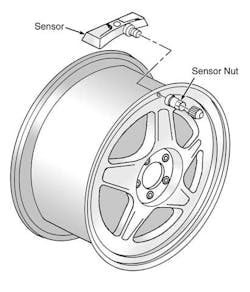
3. Remove the tire pressure sensor nut (see Figure 1).
4. Remove the sensor itself.
Now you’re ready to install the new sensor. Follow these steps:
1. Clean any dirt and debris from the grommet sealing areas. Install the grommet on the sensor valve stem.
2. Insert the sensor in the wheel hole with the air passage facing away from the wheel.
3. Install the sensor nut. Position the sensor body parallel to the inside wheel surface while tightening the nut to 62 in.-lbs.
4. Install the tire on the wheel. Before installation, however, make sure you position the mounting head 180 degrees from the valve stem and position the bead transition area 45 degrees counterclockwise of the valve stem. Also make sure you rotate the tire and wheel assembly clockwise when transferring the tire bead to the inside of the rim. This will help you avoid damaging the sensor upon mounting.
Keep in mind that replacement sensors are shipped in OFF mode. The sensor must be taken out of OFF mode by spinning the tire and wheel assembly above 20 mph for at least 10 seconds. This will close the sensor’s internal roll switch.
[PAGEBREAK]
Three methods
In the 2008-09 Saturn Sky, tire pressure sensors must be relearned whenever a sensor or the RCDLR has been replaced.
Once the learn mode has been enabled, each of the sensor’s unique identification (ID) codes can be learned into the RCDLR’s memory. When an ID has been learned, the RCDLR sends a serial data message to the BCM, which sounds a horn chirp. This verifies that the sensor has transmitted its ID and the RCDLR has received and learned it.
The RCDLR must learn the sensor IDs in the proper order to determine the correct sensor location. The first ID is assigned to the left front, followed in order by the right front, the right rear and the left rear.
Each turn signal will illuminate one at a time to indicate which location is to be learned next.
The TPMS will cancel the learn mode if more than two minutes have passed since a sensor has been learned or if the ignition switch is turned to the OFF position.
If the learn mode is canceled before the first ID has been learned, the RCDLR will remember all of the previously stored IDs and their locations. As soon as the first sensor ID is learned, all other IDs are erased from the RCDLR’s memory.
The learn mode can be enabled using the vehicle’s keyless entry system, the DIC or a scan tool.
Here is the relearn procedure using the keyless entry system:
1. Turn the ignition switch ON and apply the parking brake. The left front turn signal will illuminate to indicate that the learn mode has been enabled.
2. Simultaneously press the keyless entry transmitter’s lock and unlock buttons until a horn chirp sounds.
3. Starting with the left front tire, increase or decrease the pressure for eight to 10 seconds, then wait for the horn chip.
4. Proceed as in step three for the next three sensors in the following order: right front, right rear and left rear.
5. After the last sensor has been learned, a double horn chirp will sound, indicating that all four sensor IDs have been learned. Turn the ignition switch to the OFF position. Adjust all tire pressures to specification.
[PAGEBREAK]
If using a scan tool (TPMS Sensor Activation Tool J-46079 is recommended), follow these steps:
1. Connect the scan tool. Turn the ignition switch to the RUN position and apply the parking brake.
2. Using the tool, select “SPECIAL FUNCTIONS.”
3. Select “SENSOR LEARN MODE ENABLE” and press the ENTER key. The left front turn signal will illuminate to indicate the learn mode has been enabled.
4. Press the ON soft key. A double chirp will sound.
5. Starting with the left front tire, hold the scan tool against the tire wall, aiming upward with the antenna.
Press the activate button and wait for a horn chirp. After you hear the chirp, the turn signal will illuminate, indicating the next location to be learned.
6. Proceed as in step five for the next three sensors, starting with right front, then right rear and finally, left rear.
7. After the final sensor has been learned, a double horn chirp will sound, indicating that all four sensor IDs have been learned.
8. Turn the ignition to the OFF position. Adjust all tire pressures.
Here’s how to relearn sensor IDs using the DIC:
1. Turn ignition ON and apply the parking brake.
2. Press the “INFO” button on the DIC until the “TIRE LEARN” message is displayed.
3. Press the “SET/RESET” button on the DIC until a double horn chirp sounds. This tells you that the learn mode has been enabled.
4. Starting with the left front tire, increase or decrease the pressure for eight to 10 seconds. Wait for the horn chirp sound. The chirp may occur before the eight to 10 second period has been reached or up to 30 seconds after that same time period has been reached.
5. Follow step four to ID the next three sensors in this order: right front, right rear and left rear.
6. After the left rear sensor has been learned, you will hear a double chirp.
As in the scan tool and keyless entry procedures, this lets you know that all four IDs have been learned. Turn the ignition switch to the OFF position. Adjust all tire pressures to specification.
Before performing any ID relearn procedure, make sure that no other sensor learn procedure is being performed at the time and that no other TPMS-equipped vehicle is in close proximity. ■
Information for this column comes from Mitchell 1’s ”Tire Pressure Monitoring Systems Guide” for domestic and import vehicles through 2009. Headquartered in Poway, Calif., Mitchell 1 has provided quality repair information solutions to the automotive industry for more than 80 years. For more information, visit www.mitchell1.com.