TPMS: Mazda - CX-5 – 2023
If the tire pressure monitoring system (TPMS) detects a tire with remarkably low pressure, it alerts the driver using the TPMS warning light and alarm.
Adjust the tire pressure before driving and while the tires are cold. Tire pressure changes due to changes in the ambient temperature and the internal temperature of a tire.
In regions and seasons with changing temperatures, the tire pressure changes due to ambient temperature changes. If the tire pressure is lower than the lower-limit pressure due to low ambient temperature, the TPMS warning light may turn on. When the TPMS warning light turns on, adjust the tire pressure.
Tire pressure is high after driving because the internal temperature of the tires is high. If the tire pressure is adjusted to the standard when the internal temperature of the tire is high, the tire pressure lowers when the internal temperature decreases to the same level as the ambient temperature. If the tire pressure decreases below the lower-limit pressure, the TPMS warning light might turn on.
Generally, if the temperature changes by 10 degrees, the tire’s air pressure changes by about 1 psi.
The instrument cluster performs the following functions:
- Identification code recognition function: Identifies whether the signals from the wheel units are those of the vehicle. Tire pressure determination/warning function: Determines whether the tire pressure information transmitted from the wheel units is within the specified range. If the tire pressure is lower than the specification, it alerts the driver using the TPMS warning light and TPMS warning alarm.

TPMS ID REGISTRATION
After the wheel unit replacement, registration of the wheel unit identification codes must be performed.
1) Switch the ignition ON (engine off or on).
2) Switch the ignition off.
3) Leave the vehicle with the ignition switched off for 15 minutes or more.
4) Switch the ignition ON (engine on).
5) Drive the vehicle at a speed of 16 mph or more for 10 minutes or more.
6) After driving for 10 minutes, verify that the TPMS warning light does not flash and is not illuminated.
TIRE PRESSURE SENSOR REMOVAL AND INSTALLATION
Removal
1) Remove the valve core and bleed the air from the tire.
2) Break the upper/lower tire bead.
NOTE: There are two types of procedures for breaking the tire bead:
- Method for rotating wheel against bead breaker,
- Method for securing wheel.
(See Bead Breaking Note for tips on both methods.)
3) Remove the upper/lower bead using the following procedure.
a) Install the wheel and tire to the turntable of the tire changer.
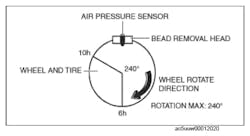
b) Set the bead removal head to the position shown in Fig. 1. Set the air pressure sensor to the position shown so it does not get damaged.
c) Rotate the turntable and remove the upper bead.
d) Grasp the tire and slide it in the upward direction.
e) Insert the tire lever as shown in Fig. 2.
f) Remove the lower bead.
To prevent damaging the air pressure sensor, do not allow the tire lever to contact the air pressure sensor.
4) Remove the air pressure sensor from the wheel using the following procedure.
To prevent damaging the air pressure sensor, remove the sensor housing before pulling out the valve.
Remove the air pressure sensor after the tire is completely removed from the wheel. Wipe off any dirt on the air pressure sensor.
a) Remove the screw.
b) Remove the sensor housing.
c) Remove the tip of the valve.
d) Using the valve removal tool, pull the valve straight out of the wheel hole.

Installation
1) Apply soapy water to the area. To prevent damaging the air pressure sensor, do not soak it in water or spray water on it.
2) Remove the cap.
3) Insert the air pressure sensor valve into the wheel valve hole.
4) Install the valve removal tool to the air pressure sensor valve.
5) Pull the air pressure sensor valve straight out of the valve hole and secure the air pressure sensor to the wheel.
Pull the air pressure sensor valve straight out of the valve hole. If the air pressure sensor valve is pulled out in the wrong direction, excessive force could be applied to the valve and damage it.
To prevent air leakage, install the valve so that there is no gap between the tip of the valve and wheel.
To prevent damaging the air pressure sensor, do not apply impact to the wheel or pressure sensor.
Install the air pressure sensor so that it does not contact the inner side of the wheel.
After applying soapy water, install within five minutes.
Install the air pressure sensor to a clean and dry wheel with no burrs/file scratches on the valve hole.
Do not use an air pressure sensor that has been damaged by being dropped from a 1 meter or more height.
Always install the valve cap except when pumping air, bleeding air, and checking air pressure.
6) Verify that the air pressure sensor is installed parallel to the wheel.
7) Apply bead wax to the tire bead area.
8) Install the tire to the wheel using the following procedure:
a) Install the wheel to the turntable of the tire changer.
b) Place the tire on the wheel. (Verify the rotation direction of the tire.)
c) Set the installation head to the location shown in Fig. 3.
Set the air pressure sensor to the position shown so that it does not get damaged.
d) Rotate the turntable and install the lower bead.
NOTE: If the upper bead slips on the wheel while installing the lower bead, stop rotating and install it again from the correct position.
e) Install the upper bead using the same installation procedure for the lower bead.
9) Pump air into the tire.
Bead Breaking Note (Method for Rotating Wheel Against Bead Breaker)
1) Install the wheel and tire to the turntable of the tire changer.
2) Set the bead breaker against the air pressure sensor.
CAUTION: Do not set the bead breaker outside of the area shown below to prevent damaging the air pressure sensor.
3) Rotate the wheel and break the upper/lower bead.
CAUTION: Do not move the air pressure sensor outside of the area shown below to prevent damaging the air pressure sensor.
Bead Breaking Note (Method for Securing Wheel)
1) Install the wheel and tire to the bead breaker.
2) Set the bead breaker against the air pressure sensor as shown in Fig. 4.
CAUTION: Do not set the bead breaker outside of the area shown below to prevent damaging the air pressure sensor.
3) Break the upper bead.
4) Break the lower bead.
5) When replacing a wheel unit(s), register the new wheel unit ID(s). (See TPMS ID REGISTRATION .)

TORQUE SPECIFICATIONS
Tightening torque 108-147 N.m {12-14 kgf.m, 80-108 ft.lbf}