DESCRIPTION & OPERATION
The TPMS (tire pressure monitoring system) continuously monitors all four tire pressure sensors whenever the vehicle is turned to the ON mode. If it detects low pressure in a tire, it alerts the driver by turning on the low tire pressure/TPMS indicator and the appropriate tire indicator. If it detects a problem in the system, the low tire pressure/TPMS indicator starts blinking. The system consists of the following components:
- Keyless access/TPMS control unit
- Tire pressure sensors
- Initiators
- System indicator
Low tire pressure/TPMS Indicator
- If the system detects low tire pressure in any of the four tires, the low tire pressure/TPMS indicator comes on.
- If a problem in the system is detected, the low tire pressure/TPMS indicator comes on after blinking for about 75 seconds.
If the system is OK, the low tire pressure/TPMS indicator should come on when you turn the vehicle to the ON mode, and then go off two seconds later. If it does not, there is a problem with the system.
Fill assist
The fill assist function signals the condition of the tire pressure when adjusting the tire pressure. The keyless access/TPMS control unit monitors the variation of tire pressure with the tire pressure sensor signal and outputs it to the MICU. The MICU will start to alert the condition of the tire pressure by flashing the turn signal/hazard lights and emitting beeps from the keyless buzzer.
Operating condition
Fill assist function operates when all the following conditions are met:
- Ignition switch: ON mode
- Vehicle speed: 0 mph (0 km/h)
- Shift position: P position/mode
- Increase/decrease rate of pressure ≥15 kPa (0.15 kgf/cm 2, 2.2 psi)
However, the fill assist function may not operate under the following conditions:
- When increase/decrease rate of pressure does not reach 15 kPa within one minute.
- When using a portable handheld compressor.
Operation
The fill assist function operates the turn signal/hazard lights and keyless buzzer in three modes depending on the tire pressure. The system will also be activated when the tire pressure decreases (due to punctures, etc.) and when all the criteria of the operating condition have been met. The system can only detect one tire that has the variation of tire pressure at a time. When inflating multiple tires consecutively, the system begins to monitor the first tire that reaches the operating condition.
However, the tire pressures should be adjusted individually since the system is unable to detect which tire is on the operating condition first.
Tire pressure changing by temperature
Tire pressures increase slightly as the temperature in the tires rises during driving. Pressures can also increase or decrease slightly with changes in outside air temperature. A temperature change of about 18 degrees Fahrenheit changes tire pressure by about 1.5 psi. If the temperature drops, tire pressure could decrease enough to turn on the low tire pressure/TPMS indicator, but later, the tire temperature could increase enough to turn indicator off. To resolve a complaint of such intermittent indications, confirm and clear the stored DTC (s) and check the tire pressures.
Problems that are not system faults
- Cold weather: When the weather is extremely cold, around four degrees below zero or colder, the output of the lithium battery in each tire pressure sensor may drop far enough that the TPMS control unit sets a DTC for low battery voltage (C1801-92, C1802-92, C1803-92 or C1804-92) even though the system is normal.
- Non-TPMS type wheels (including the spare tire): Vehicles equipped with TPMS must use wheels made for the system. Every TPMS-type wheel has an exclusive mark; do not use any other type of wheel. When a flat tire is replaced with the spare tire, a CHECK TPMS message on the MID is displayed (DTC C1801-87, C1802-87, C1803-87 or C1804-87) because the system is no longer receiving the signal from the flat tire's transmitter. This is not a problem with the spare tire.
TPMS system components
TPMS control unit: The TPMS control unit sends signals to the initiators and receives signals from the tire pressure sensor to verify pressure sensor IDs every time the vehicle is turned to the ON mode. It also receives signals from the transmitters for tire pressure, tire temperature and the sensor battery condition. It continuously monitors and controls the system.
Tire pressure sensor: The tire pressure sensor is an integrated unit made up of each tire valve stem, a pressure sensor and a transmitter. The tire pressure sensors are attached to the inside of each wheel, around the valve stem. The sensor transmits internal tire information using an RF (radio frequency) band wave signal one time per 60 seconds to the TPMS control unit. Each tire pressure sensor has its own tire pressure sensor ID to prevent jamming by similar systems on other vehicles.
Initiator: The initiators are mounted on the top of each wheelwell. When the vehicle is turned to the ON mode, the initiators send a LF (low frequency) band wave signal to the tire pressure sensor, switching it from sleep mode to normal function mode. When the vehicle is turned to the OFF (LOCK) mode, the sensors switch from normal function mode back to sleep mode to extend their battery life.
Wheel: The TPMS will not work unless TPMS-type wheels are installed on the vehicle. The original equipment wheels have a "TPMS" mark on them, and are counterweighted by adding material to counterbalance the weight of the tire pressure sensor.
MEMORIZING THE TIRE PRESSURE SENSOR ID
All four sensor IDs must be memorized to the TPMS control unit whenever you do any of these actions:
- Replace the keyless access/TPMS control unit.
- Replace the tire pressure sensor.
- Substitute a known-good wheel with tire pressure sensor.
NOTE:
- To ensure the TPMS control unit memorizes the correct sensor ID, the vehicle with the new tire pressure sensor must be at least 10 feet away from other vehicles that have sensors.
- When replacing the keyless access/TPMS control unit, use the HDS to memorize sensor IDs.
Memorizing a tire pressure sensor ID automatically
After rotating the tires or replacing a tire pressure sensor, drive the vehicle for at least 40 seconds at a speed of 15 mph or more, and all the sensor IDs will be memorized automatically.
After the sensor IDs are memorized, reduce the pressure in all four tires to less than the appropriate specification, and check to see that the four tire indicators come on.
Memorize a tire pressure sensor ID with the HDS
The HDS can memorize the sensor ID of a new tire pressure sensor or a previously memorized sensor ID.
1. Turn the vehicle to the OFF (LOCK) mode.
2. Connect the HDS to the data link connector (DLC).
3. Turn the vehicle to the ON mode.
4. Make sure the HDS communicates with the vehicle and the TPMS control unit. If it does not communicate, go to the DLC circuit troubleshooting.
NOTE:
- See the HDS help menu for specific instructions.
- When replacing the keyless access/TPMS control unit, use the HDS to memorize sensor IDs.
- After the sensor IDs are memorized, reduce the pressure in all four tires to less than the appropriate specification, and check to see that the four tire indicators come on.
5. Memorize the tire pressure sensor ID by following the screen prompts on the HDS.
6. Turn the vehicle to the OFF (LOCK) mode.
TIRE PRESSURE SENSOR REMOVAL & INSTALLATION
Removal
Each tire pressure sensor contains a lithium anode battery that is not removable. The complete tire pressure sensor should be disposed of according to local battery disposal guidelines or requirements. An improperly disposed of battery can be harmful to the environment.
Remove the tire from the wheel according to the procedure listed by your tire changing machine manufacturer.
1. Lift the vehicle.
2. Remove the wheel with the faulty tire pressure sensor.
3. Remove the tire valve stem cap and the valve stem core to deflate the tire.
4. Remove any balance weights.
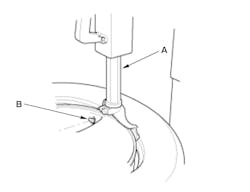
5. Break the bead loose from the wheel with a commercially available tire changer.
- Do the outside of the wheel first.
- Position the wheel as shown so the valve stem is 90 degrees from the bead breaker as shown.
- Do not position the bead breaker of the tire changer too close to the wheel.
6. Position the wheel so that the tire machine and the tire iron, are next to the valve stem, and will move away from it when the machine starts.
7. Remove the tire from the wheel.
8. As shown in Fig. 3, using the TORX bit, remove the TORX screw and the tire pressure sensor housing from the valve assembly. Check the tire pressure sensor housing for any cracks, deforms or damages and replace it if necessary.
9. Cut around the valve bulb to make the removal of the valve assembly easier.
10. Do not remove the valve assembly before removing the tire pressure sensor housing. Pull out the valve assembly vertically through the wheel hole using the commercially available valve stem puller tool.
Installation
1. Install the tire pressure sensor housing on to the valve assembly. Make sure the sensor housing is fully seated.
2. Install TORX screw using the TORX bit and the adjustable torque screwdriver and tighten it to specifications. Install the TORX screw until the screw head is in contact with the sensor housing.
3. Before installing the tire pressure sensor, clean the mating surfaces on the sensor and the wheel.
4. Apply a mild soap and water solution to the valve insertion cone surface.
5. Insert the tire pressure sensor in the wheel hole.
6. Position the tire pressure sensor by aligning the gap within the angle as shown.
7. Install a commercially available valve stem puller tool on the valve stem thread, and pull the tire pressure sensor straight through the wheel hole and perpendicularly to the wheel hole. Make sure there is no gap between the valve bulb and wheel. Make sure the tire pressure sensor is installed within the angle.
8. Lube the tire bead sparingly with a paste-type tire mounting lubricant, and position the wheel so that the tire machine is next to the valve stem and will move away from it when the machine starts.
9. Install the tire onto the wheel.
10. With a dry air source, inflate the tire to 43.5 psi to seat the tire bead to the wheel. Make sure the tire bead is seated evenly on both sides of the wheel.
11. Install the valve stem core and adjust the air pressure to the specifications listed on the door jamb.
12. Install the valve stem cap.
13. Check and adjust the wheel balance.
14. Install the wheel.
15. Connect the HDS, and memorize the tire pressure sensor IDs. Do not memorize the IDs automatically.
About the Author
Mitchell 1
Information for this column comes from the tire pressure monitoring systems data in ProDemand, Mitchell 1's auto repair information software for domestic and import vehicles. Headquartered in San Diego, Mitchell 1 has provided quality repair information solutions to the automotive industry since 1918. For more information, visit www.mitchell1.com.