DESCRIPTION & OPERATION
Tire Pressure Sensor
The tire pressure sensor integrated with the valve is installed in each wheel, and transmits the detected tire pressure and temperature signal in the form of the radio wave. The radio signal is received by the low tire pressure warning control unit (tire pressure receiver).
Service Notice and Precautions for TPMS
Warning: Radio waves could adversely affect electric medical equipment. Those who use a pacemaker should contact the electrical medical equipment manufacturer for the possible influences before use.
Low tire pressure warning lamp blinks for one minute, then turns ON when any malfunction occurs except low tire pressure. Erase the self-diagnosis memories for Tire Pressure Monitoring System (TPMS), or register the ID to turn low tire pressure warning lamp OFF.
ID registration is required when replacing tire pressure sensor or low tire pressure warning control unit.
For easy fill tire alert function, refer to the following.
- When inflating the tires, park the vehicle in the safe area and ensure the safety of the working area.
- Read and understand the easy fill tire alert function prior to use.
- Inflate the tires one at a time.
- If there is no response for approximately 15 seconds or more after inflating the tires, cancel the use of the easy fill tire alert function or move the vehicle approximately 3.2 feet backward or forward to try again. The air filler pressure may be weak or out of service area.
- Despite the high-precision TPMS pressure sensor, an indicated value may differ from that of the pressure gauge.
- Air pressure is measured rather high due to the rise in tire air temperature after driving.
- If TPMS is malfunctioning, the easy fill tire alert is unusable.
Replace grommet seal, valve core and valve cap of tire pressure sensor in TPMS when replacing each tire by reaching the wear limit.
Never install tire pressure sensor from other vehicles. The TPMS does not function if specified Genuine Nissan tire pressure sensor is not installed.
Because the tire pressure sensor conforms to North America radio law, the following items must be observed:
- The sensor may be used only in North America.
- It may not be used in any method other than the specified method.
- It must not be disassembled or modified.
ID REGISTRATION PROCEDURE
Description
This procedure must be performed after replacement of a tire pressure sensor or low tire pressure warning control unit.
Work Procedure
TPMS ID registration can be performed using one of the following procedures:
- Transmitter Activation tool [KV48105501 (J-45295-A)] using CONSULT — preferred method
- Signal Tech II tool (J-50190) using CONSULT — preferred method
- Signal Tech II tool (J-50190) without CONSULT
- CONSULT only
TPMS REGISTRATION WITH TRANSMITTER ACTIVATION TOOL [KV48105501 (J-45295-A)] and CONSULT
1. Press push-button ignition switch ON.
2. Select "ID REGIST" in "Work support" mode of "AIR PRESSURE MONITOR."
3. Select "Start" on "ID REGIST" screen.
4. Hold the transmitter activation tool [KV48105501 (J-45295-A)] (1) against the side of the left front tire, near the valve stem.
5. With the tool held at a zero to 15 degree angle to the tire, press and hold the transmitter activation tool button until the indicator lamp turns OFF (approximately five seconds).
6. Repeat steps four and five for the remaining tires in this order: right front, right rear and left rear.
7. When ID registration is complete, check the following pattern at each wheel.
Turn Signal Lamp - 2 blinksCONSULT - "Yet (red)" "Done (green)"
8. After the ID registration procedure for all wheels is complete, press "End" on the CONSULT to finish ID registration.
9. Test drive the vehicle to ensure that the TPMS lamp is OFF and no warning messages are present.
TPMS REGISTRATION WITH SIGNAL TECH II TOOL (J-50190) using CONSULT
NOTE: The Signal Tech II must be updated with the newest software version in order to perform the below procedures.
1. Adjust the tire pressure for all tires to the recommended value.
2. Press push-button ignition switch ON.
3. Select "ID REGIST" in "Work support" mode of "AIR PRESSURE MONITOR".
4. Select "Start" on "ID REGIST" screen.
5. Turn on the Signal Tech II tool [- (J-50190)].
6. Hold the Signal Tech II against the side of the left front tire, near the valve stem.
7. With the tool held at a zero to 15 degree angle to the tire, select "Activate Sensor" from the main menu, then press and release the "OK" button to activate the sensor. Once the sensor is activated, the vehicle parking lamps will flash and the sensor ID will appear on the CONSULT screen.
8. Repeat steps six and seven for the remaining tires in this order: right front, right rear and left rear.
9. When ID registration is complete, check the following pattern at each wheel.
Turn Signal Lamp - 2 blinksCONSULT - "Yet (red)" "Done (green)"
10. Once all sensors have been activated, select "End" on the CONSULT to finish ID registration.
11. Test drive the vehicle to ensure that the TPMS lamp is OFF and no warning messages are present.
TPMS REGISTRATION WITH SIGNAL TECH II TOOL (J-50190) without CONSULT
1. Adjust the tire pressure for all tires to the recommended value.
2. Turn on the Signal Tech II tool (J-50190) and select "TPMS Check" from the main menu.
3. Select vehicle model and year.
4. When prompted, hold the Signal Tech II against the side of the left front tire, near the valve stem.
5. With the tool held at a zero to 15 degree angle to the tire, press and release the "OK" button to activate the sensor. Once the sensor is activated, the tool will sound a tone and the tire pressure will be displayed.
6. Repeat steps four and five for the remaining tires in this order: right front, right rear and left rear.
7. When prompted, connect the tool to the data link connector. The tool will connect to the low tire pressure warning control unit, read the VIN, read sensor IDs and check for TPMS DTCs. Along with DTCs detected, one of the following will be displayed next to each wheel:
- N/A: Not applicable because no ID found by the tool
- OK: Wheel and sensor are in original position
- NEW: New ID found compared to low tire pressure warning control unit
- RT: Wheel has been rotated
- Low Press: Low tire pressure
8. If no DTC is present or the repair has been completed, press the "OK" button to register the IDs and clear DTCs.
9. Test drive the vehicle to ensure that the TPMS lamp is OFF and no warning messages are present.
10. Print a Signal Tech II Audit Report for your records. Refer to the Signal Tech II User Guide for instructions.
TPMS REGISTRATION WITH CONSULT ONLY
1.Adjust the tire pressure for all wheels to match the list below:
- Left front: 35 psi,
- Right front: 32 psi,
- Right rear: 29 psi,
- Left rear: 26 psi.
2. Press push-button ignition switch ON.
3. Select "ID REGIST" in "Work support" mode of "AIR PRESSURE MONITOR".
4. Select "Start" on "ID REGIST" screen.
5. Drive the vehicle at a speed greater than 25 mpg for three minutes or more.
6. After ID registration for all wheels is complete, press "End" on the CONSULT to finish ID registration
7. Adjust the tire pressures for all tires to the recommended value.
8. Test drive the vehicle to ensure that the TPMS lamp is OFF and no warning messages are present.
TIRE PRESSURE SENSOR REMOVAL AND INSTALLATION
REMOVAL
1. Remove wheel and tire using power tool.
2. Remove valve cap and valve core to deflate the tire.
3. Remove the valve stem nut and allow tire pressure sensor to fall into tire.
Note: If the tire is to be reused, apply a matching mark on the tire in line with the position of the valve stem assembly for the purpose of wheel and tire balance adjustment after installation.
4. Lubricate the tire outside bead well with a suitable non-silicone lubricant, and remove outside of tire from the wheel.
Caution:
- Do not use silicone lubricant. Use of silicone lubricant will deteriorate the tire and wheel.
- Be sure not to damage the wheel or tire pressure sensor.
- Do not allow lubricant to make contact with tire pressure sensor.
- Verify that the tire pressure sensor is at the bottom of the tire while performing the above.
5. Lubricate the tire inside bead well with a suitable non-silicone lubricant, and remove inside of tire from the wheel.
Caution:
- Do not use silicone lubricant. Use of silicone lubricant will deteriorate the tire and wheel.
- Be sure not to damage the wheel.
6. Set the tire onto the tire changer turntable so that the tire pressure sensor inside the tire is located close to the valve stem hole in the wheel.
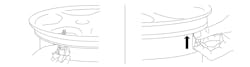
7. Turn the tire so that the valve stem hole in the wheel is at the bottom and bounce so that the tire pressure sensor inside the tire is near the valve stem hole in the wheel. Carefully lift tire onto turn table and position the valve stem hole in the wheel (and tire pressure sensor) 270 degrees from mounting/dismounting head. Be careful not to damage the wheel or tire pressure sensor.
8. Remove the tire pressure sensor from the tire.
9. Remove the grommet seal.
INSTALLATION
1. Apply a suitable non-silicone lubricant to the tire inside bead.
Caution:
- Replace the tire pressure sensor if the valve stem has deformations, cracks, damage, or corrosion.
- Do not drop or strike the tire pressure sensor. Replace the tire pressure sensor if it has been dropped from higher than one meter.
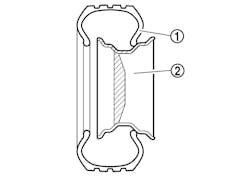
2. Install the tire inside bead onto the wheel in the position shown in Fig. 4.
3) Install the grommet seal onto the valve stem as shown.
- Do not reuse grommet seal.
- Check the direction of the grommet seal.
- Insert new grommet seal all the way to the base of tire pressure sensor valve stem.
4. Hold tire pressure sensor as shown in Fig. 6 and install the tire pressure sensor in the direction shown in illustration below. Tighten the valve stem nut.
- Do not reuse valve core and valve cap.
- Check that grommet seal is free of foreign matter.
- Do not push the tire pressure sensor body in any direction other than indicated by the arrow when installing valve stem nut to avoid damage to the grommet seal.
- Check that grommet seal contacts completely with wheel.
- Check that grommet seal is not pinched or folded over in, as this can cause a air leak.
- Manually tighten valve stem nut all the way to the wheel. (Do not use a power tool to avoid impact.)
5. Place wheel on turntable of tire machine. Ensure that tire pressure sensor is 270 degrees from mounting/dismounting head. Do not touch tire pressure sensor with mounting head.
6. Apply a suitable non-silicone lubricant to the tire outside bead.
- Do not allow lubricant to make contact with tire pressure sensor.
- When installing, check that the tire turns together with the wheel to prevent damage to the tire pressure sensor from contact with the tire bead.
7. Install tire outside bead onto wheel using same process as inside bead.
Note: If the tire is being reused, align the matching mark applied on the tire with the position of the valve stem assembly for the purpose of wheel and tire balance adjustment after installation. Make sure that the tire does not rotate relative to wheel.
8. Install the valve core and inflate tire.
9. Install the valve cap.
10. Balance the wheel and tire. Install wheel and tire in the appropriate position on vehicle.
11. Perform the ID registration procedure.
If replacing the tire pressure sensor, then the ID registration procedure must be performed.
About the Author
Mitchell 1
Information for this column comes from the tire pressure monitoring systems data in ProDemand, Mitchell 1's auto repair information software for domestic and import vehicles. Headquartered in San Diego, Mitchell 1 has provided quality repair information solutions to the automotive industry since 1918. For more information, visit www.mitchell1.com.