SUBJECT VEHICLE: 2008-13 Toyota Land Cruiser.
RELEARN PROCEDURE? Yes.
SPECIAL TOOLS NEEDED? Yes, a Toyota intelligent tester or Techstream.
Each tire pressure monitoring system (TPMS) warning valve and transmitter on 2008-13 Toyota Land Cruisers is equipped with a tire pressure sensor and transmitter.
Installed in each tire wheel, the sensor measures the tire pressure. The measured value and transmitter ID are transmitted to the tire pressure warning antenna and receiver on the body as radio waves and then sent to the tire pressure warning electronic control module (ECU) from the tire pressure warning antenna and receiver.
NOTE: The system will need to be initialized when tire pressures are adjusted; tires are rotated; tires are replaced with tires of different pressures; and tire pressure sensor and/or tire pressure monitor ECU are replaced. When tire pressure sensors and/or tire pressure monitor ECUs are replaced, the sensor IDs must be memorized (registered) by the tire pressure monitor ECU prior to system initialization. See reset procedures.
If the transmitter ID has already been registered, the ECU compares the measured air pressure value with the standard value. When the value is less than the standard value registered in the tire pressure monitor ECU, the warning light on the instrument cluster comes on. NOTE: Transmitters have different bending angles at the tire pressure monitor valve sub-assembly. They are not interchangeable with other wheels.
Perform the following to test the warning light:
1. Turn the ignition switch off.
2. Connect the Techstream to the DLC3.
3. Turn the ignition switch to the ON position and activate the Techstream.
4. Enter the following menus: Body Electrical/Combination Meter/Active Test.
5. Check the condition of the tire pressure warning light by operating the Techstream.
Tire pressure monitor warning light
If the ECU detects trouble, the tire pressure warning light blinks (turns on after blinking for one minute) and the tire pressure monitor is canceled at the same time. At this time, the ECU stores a diagnostic trouble code (DTC) in the memory. NOTE: When replacing the tire pressure warning ECU, read the IDs stored in the old ECU using the Techstream and write them down before removal.
[PAGEBREAK]
Reset procedures
NOTE: The system will need to be initialized when tire pressures are adjusted, tires are rotated; tires are replaced with tires of different pressures; tire pressure sensor and/or tire pressure monitor ECU are replaced. See initializing tire pressure monitor system.
When a tire pressure sensor and/or tire pressure monitor ECU are replaced, the sensor ID must be memorized (registered) by the tire pressure monitor ECU prior to system initialization. See tire pressure sensor registration.
NOTE: If the negative battery terminal is disconnected, initialize the following systems after the cable is reconnected: variable gear ratio steering and moon roof. Refer to the owner’s manual or manufacturer service information.
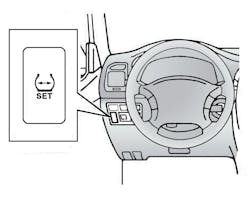
If tire pressures are adjusted, initialize the TPMS. With the ignition ON, press and hold the tire pressure warning reset switch until the tire pressure warning light blinks slowly three times and the message “TIRE PRESSURE RESET PROCEEDING” appears on the multi-information display.
Wait a few minutes, then turn the ignition OFF.
Initializing tire pressure monitor system
NOTE: Perform initialization after transmitter ID registration is completed (if registration is required). NOTE: Perform initialization in the following cases: after tire pressures are adjusted; after replacement of the tire pressure warning ECU; after replacement of a tire pressure sensor; specified tire pressure changes depending on the size or type of tire; and changing the standard tire inflation pressure value due to trailer towing.
NOTE: Perform the tire pressure adjustment after the vehicle has sufficiently cooled down. If the vehicle is not sufficiently cooled down, increase the air pressure by 3-4 psi (20-30 kPa) in addition to the specified value.
NOTE: In winter, if tire pressures decrease due to the ambient temperature, increase the air pressure by 3 psi to 4 psi (20-30 kPa) above the specified value 20 minutes after the initialization with the ignition switch ON.
1. Set the tire pressure of all wheels (including the spare tire) to the pressure specified on the tire and loading information label.
2. With the vehicle stopped and the parking brake applied, turn the ignition switch ON.
3. Press and hold the tire pressure warning reset switch until the tire pressure warning light blinks three times at one-second intervals (see Figure 1).
4. Turn the ignition switch OFF.
5. Connect the Techstream to the DLC3. Turn the ignition switch ON, then turn the Techstream on.
6. Enter the following menus: chassis/tire pressure monitor/data list. NOTE: If equipped, initialization can be confirmed on the Multi-information display. It may take about two to three minutes until the values are displayed. The values are displayed randomly (see Figure 2).
[PAGEBREAK]
7. Confirm that the expected tire pressure data of all tires is displayed on the Techstream Data List screen. NOTE: If the initialization has not been completed successfully, DTC C2177/77 is set after a vehicle speed of more than 5 mph (8 km/h) continues for 20 minutes or more.
NOTE: Initialization can be terminated by connecting terminals 13 (TC) and 4 (CG) of the DLC3 (see Figure 3).
Tire pressure sensor registration
It is necessary to register the transmitter ID when installing a new sensor. To perform the registration procedure, a Toyota Techstream must be used.
Register transmitter ID
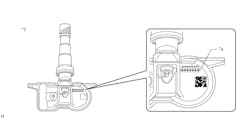
NOTE: When installing a new tire pressure sensor, take a note of the seven-digit number (transmitter ID) written on the new sensor.
1. Set the tire pressure of all wheels (including the spare tire) to the pressure specified on the tire and loading information label.
2. With the ignition OFF, connect the Techstream to the DLC3.
3. Turn ignition switch to ON.
4. Enter the following menus: chassis/tire pressure monitor/utility/ID registration. Registration can be started while in initialization mode. However, initialization will be canceled when the registration is started. If this step is not completed within 30 seconds, registration mode will be canceled.
5. Perform the procedures displayed on the Techstream.
Confirm transmitter ID registration
1. Enter the following menus: chassis/tire pressure monitor/data list.
2. Read the “ID Tire Inflation Pressure” values.
3. Confirm that the expected tire pressure data of all tires (including the spare tire) is displayed on the Techstream screen. NOTE: It may take up to two to three minutes to update the tire pressure data. If the values are not displayed after a few minutes, perform troubleshooting according to the inspection procedure for DTCs C2121/21 to C2125/25. If the IDs have not been registered, DTC C2171/71 is set after three minutes or more. NOTE: If equipped, initialization can also be confirmed on the Multi-information display. It may take about two to three minutes until the values are displayed (see Figure 2).
Demounting/mounting procedures
NOTE: If the tire pressure valve sub-assembly is going to be replaced, make a note of the seven-digit number (transmitter ID) before installation, as it cannot be seen after sensor is installed (see Figure 4). Whenever a new sensor is installed, it will need to be registered in the tire pressure monitor ECU.
Removal
1. When replacing a wheel or tire, tire pressure sensors must be set up in one of the following ways.
a. Remove the sensor from the old wheel and install it to the new wheel.
b. Keep the same wheel with tire pressure sensor, and replace only the tire.
c. Use a new wheel and sensor (the new sensor must be registered).
2. Remove the wheel. Remove the valve core and cap, and release the air from the tire. NOTE: Keep the removed cap, valve core, nut and washer.
3. After ensuring that air is sufficiently released, remove the nut and washer that is used to fix the tire pressure monitor valve sub-assembly and drop the sensor inside the tire. NOTE: Be careful not to damage the valve sub-assembly due to interference between the sensor and tire bead.
[PAGEBREAK]
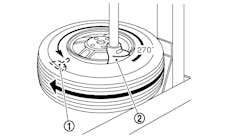
4. After dropping the tire pressure monitor valve sub-assembly into the tire, disengage the bead using the shoe of the tire remover (see Figure 5).
5. Remove the bead on the upper side in the usual operation.
6. Take out the sensor from the tire, and remove the bead on the lower side as in usual operation. NOTE: Check that no cracks or damage is identified on the grommet. If so, replace the grommet together with the washer and nut. NOTE: Tire pressure sensor is powered by a lithium battery. When disposing of the sensor, remove the battery and dispose of properly.
7. Remove the inner grommet from the tire pressure monitor valve subassembly.
Installation
1. Insert the tire pressure monitor valve into the valve installation hole. Insert from the inside of the rim so that the print surface can be seen (see Figure 4). Check for the following:
a. That there is no deformation, damage or abnormalities on the transmitter.
b. That no foreign matter is on the inner grommet and around the rim hole.
c. If installed in the reverse direction, the tire pressure valve may be damaged or fail to transmit signals at high speed.
d. If installing a new tire pressure monitor valve, write down the ID number before installation (see Figure 4). It is necessary to register an ID in the ECU after installation.
2. Install the washer on the tire pressure monitor valve from the rim side, and tighten the nut to 35 in.-lbs. (4 N.m). Check for the following:
a. Ensure no foreign matter is on the washer and nut.
b. If tire pressure monitor valve was removed, check that there is no damage or cuts, and no foreign matter such as mud, dirt or sand attached to the grommet. Replace the grommet with a new one if any of these defects are found.
c. Check that there is no oil, water or lubricant around the rim hole, tire pressure monitor valve, washer and nut. Failing to do so may result in improper installation.
3. After the tire is inflated, the valve nut may be loose. Retighten the nut to the specified torque, and then check for air leaks with soapy water. CAUTION: If the sensor is positioned outside this area, it generates interference with the tire bead.
4. Set the wheel disc to the mounting machine, and install the lower tire bead.
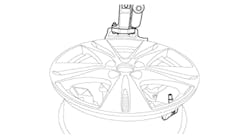
5. Making sure that the tire bead and tool do not interfere with the main body of the sensor and that the sensor is not clamped by the bead, install the upper bead.
6. When putting air into the tire, first install the tire pressure valve straight on the stem of the tire pressure sensor.
7. Install the tire and wheel assembly.
8. When a new sensor is installed, the ID code will need to be registered. See reset procedures.
9. After completing the operation, remove the valve core to rapidly release the air in the tire. Ensure that the tire pressure warning light comes on. If the warning light does not come on, refer to the appropriate manufacturer service information.
10. If there is an air leakage, tighten the nut to a force of 35 in.-lbs. (4 N.m), and push the valve core two to three times to remove any dirt attached to the valve core. If air continues to leak, replace the grommet, washer and nut. ■
Information for this column comes from Mitchell 1’s “Tire Pressure Monitoring Systems Guide” for domestic and import vehicles through 2012. Headquartered in Poway, Calif., Mitchell 1 has provided quality repair information solutions to the automotive industry for more than 80 years. For more information, visit www.mitchell1.com.


