After so many years of publishing our Performance Handbook — 26 years and counting! — you might think it would be hard to pick our most popular stories. Surprisingly it isn’t.
Based on our feedback, when we write about wheel offset, it is a social media sensation for us! And despite the exclamation point, that statement is not hyperbole.
So as part of the 100th anniversary of Modern Tire Dealer, we collected our wheel offset stories from 2013-2017 and combined them into a shortened primer for measuring wheel offset.
If it leaves you wanting more, we can accommodate you. Just follow these three simple steps: 1) Go to www.moderntiredealer.com; 2) Click on our White Paper channel; and 3) download “Helping your customer understand why wheel offset matters” by Jacques Gordon.
It never hurts to be more informed about a topic so important to the handling and safety of a vehicle. — Bob Ulrich
A car’s chassis is more than the sum of its parts. Everything from the shock absorber’s top bushing right down to the tire contact patch is designed to work together as one complete system.
Changing the design or material or just the adjustment of any one part can have an impact on the car’s handling and braking, not to mention the way the car feels as it rolls down the road.
With this in mind, there are three factors that consumers and service professionals must take into account when choosing and installing a different size of wheel.
1. Plus sizing. When you are changing the size of the wheels, the overall diameter of the tire and wheel assembly must remain the same to keep the proper speedometer and odometer settings. For example, when you mount and balance wheels that are an inch larger than the originals, the profile of the new tires must be an inch smaller in order to keep the same overall tire/wheel diameter. In this example, the process is called Plus-One sizing. The same theory applies to mounting wheels one-inch less than the originals; in that case, the process would be called Minus-One sizing.
2. Proper wheel size. The wheel must be the correct and approved width for the size of tire that it will carry. A chart of approved wheel widths for tire sizes is available in the Ultimate Wheel & Tire Plus Sizing Guide (www.plussizingguide.com) and the Tire Guide (tireguides.com).
3. Wheel offset. Perhaps the most important factor in choosing and installing new wheels is the proper handling of wheel offset. Offset also can be one of the most difficult factors to get right when replacing wheels. It’s a concept that is often very difficult for customers to understand, and can be an enormously difficult concept for service professionals to explain.
However, it is important to get it right, because getting the offset wrong risks badly damaging the replacement wheels and tires as well as suspension components, and can put the driver at serious risk of a blowout.
This article is about the basics of understanding and measuring wheel offset.
FROM THE CONTACT PATCH PERSPECTIVE
Offset, scrub radius and contact patch are the only three technical terms we need to understand. You’ve probably read about “wheel offset,” typically described as the distance between the centerline of the wheel and the face of the wheel’s mounting flange where it touches the hub. However, offset might be easier to visualize with a few simple drawings that focus on the tire contact patch.When the surface of the mounting flange is exactly aligned with the center of the tire contact patch, offset is zero. If the flange is inside the center of the contact patch (closer to the center of the car), offset is negative. If the flange is outside the center of the contact patch (closer to the curb), offset is positive (see Figure 1).
On most OEM wheels, offset is positive (contact patch slightly inboard), and it can have a major effect on steering feel and stability during acceleration and braking. That’s because on the front suspension, wheel offset determines “scrub radius.” We can describe that by looking at how the contact patch moves in a turn.
When the front wheels are steered left or right, the center of the contact patch doesn’t just pivot around a single point; it swings through a slight arc. To visualize this, lay a pen on the table and hold the top end still. As you swing the other end left and right, the tip doesn’t move in a straight line, it moves through an arc. The radius of that arc is the distance between the pivot point that you are holding and the tip that moves through the arc.Now make another drawing to put that arc on the car. Looking at the car head-on, imagine a line drawn from the upper strut mount or upper ball joint and down through the lower ball joint, and then on down to the road. The distance between the center of the tire’s contact patch and the point where that line touches the road is the scrub radius. If the line touches the road inboard of the contact patch, scrub radius is positive. If the line touches the road outboard of the contact patch, scrub radius is negative (see Figure 2).
That’s the technical explanation, but here’s an easier way to remember it. The point where that line meets the road is the steering pivot point, same as where you held one end of the pen. As the wheel is steered, the point at the center of the contact patch moves through an arc around that pivot point. The arc can be inboard (negative scrub radius) or outboard (positive scrub radius) of the pivot point, and the distance between the arc and the point might be just a few millimeters, but that small distance makes a big difference in what the driver feels in the steering wheel.
HOW TO MEASURE OFFSET
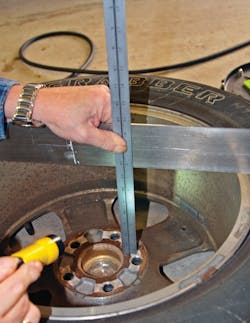
Sometimes the offset isn’t printed on the wheel, or it might be printed in digits that are difficult to read or impossible to decode. No worries; it’s easy to measure offset yourself.Technically, offset is the distance from the hub mounting flange to the centerline of the wheel between the mounting beads. Since you can’t measure between the beads with the tire on the wheel, here’s an easy way to find offset by measuring from the tire sidewall.
1. Lay the wheel/tire assembly on the floor and place a straight edge across the tire.
2. Measure the distance from the floor to the straight edge and divide by two. That calculates the centerline of the wheel. If the centerline number is smaller than the hub measurement, offset is positive; if it is larger, offset is negative.
3. Measure the distance from the floor to the straight edge and divide by two. That calculates the centerline of the wheel. If the centerline number is smaller than the hub measurement, offset is positive; if it is larger, offset is negative.
4. Measure the distance from the floor to the straight edge and write down that number.
5. Divide that number by two to calculate the centerline of the wheel.
6. Now measure from the hub flange to the straight edge.
7. Subtract the smaller number from the larger number. That gives you the offset of the wheel. If the centerline number is smaller than the hub measurement, offset is positive.
On most cars, changing offset by just 5 mm is enough to notice a change in the car’s handling because it changes scrub radius by the same amount, and that might already be only a few millimeters. If the OEM wheels have a positive offset, you can safely install wheels with even more positive offset and use spacers to move the contact patch out to its original position, keeping scrub radius the same. Just make sure the new wheels and tires fit inside the fender without rubbing anything.
If the new wheels have negative offset, there’s nothing you can do to move the contact patch in toward the center of the car. The only way to know for sure how much the new offset will affect scrub radius is to put the car on an alignment rack.
A FEW FINAL DETAILS
Even if you’re confident the wheels have been properly selected for the vehicle, it’s up to your technician to make sure everything fits properly. It’s a good idea to test-fit the wheel onto the front and rear hubs before mounting the tire. The first thing to check is brake caliper clearance: On OEM wheels it might be as small as 1/8 of an inch (4 mm). This can be hard to see, but it’s easy to simply install the bare wheel and turn it by hand. If clearance is that tight, the tech must take extra care when placing the wheel weights.
Mounting a tire on an aftermarket wheel versus an OEM wheel may be different; it depends on the location of the wheel’s drop center. Usually the drop center is toward the outside of the wheel, so the wheel is placed outside up on the tire changer. But some aftermarket wheels have the narrowest part of the drop center toward the inside of the wheel. These must be placed on the tire machine inside up. If not, the machine will try to stretch the bead — which can’t stretch — and that can damage the wheel, the tire, the tire machine or the technician.
Finally, make sure your techs tighten the lug nuts with a properly calibrated torque wrench every single time! Uneven lug nut torque is almost guaranteed to cause warped brake rotors within a few thousand miles. Finally, remind your customers to come back after five to 50 miles to get re-torqued.
3 THINGS TO REMEMBER ABOUT WHEEL OFFSET
- If the new wheels are the same width, the new offset should ideally be within 5 mm of the old offset in either direction. If offset must be substantially different, avoid using more positive offset at all costs.
- If the new wheels are wider, backspacing must be calculated. The offset on the new wheels may need to be less to counteract the extra width.
- Offset must be carefully checked even if you are putting on different OEM wheels from the same maker.
COMPENSATING FOR WHEEL OFFSET
If you have a service information system or an alignment machine with a built-in database, look up “steering angle inclination,” sometimes called “steering axis inclination” or “king pin angle.”
On a vehicle where it’s adjustable, changing the angle of that line will adjust scrub radius to compensate for changes in wheel offset. Some OEMs use this adjustment to set scrub radius on vehicles that are sold with different wheel size options.
OFFSET VS. BACKSPACING
Closely related to offset is the concept of backspacing. Offset and backspacing are often spoken of as if they are the same thing, but they are very different. Backspacing is defined as the distance between the mounting plate and the inner flange of the wheel. Backspacing is, therefore, the combination of the offset and the wheel width. This comes into play if the new wheels are wider than the old, as the offset may need to change to compensate for the greater width.
About the Author

Bob Ulrich
Bob Ulrich was named Modern Tire Dealer editor in August 2000 and retired in January 2020. He joined the magazine in 1985 as assistant editor, and had been responsible for gathering statistical information for MTD's "Facts Issue" since 1993. He won numerous awards for editorial and feature writing, including five gold medals from the International Automotive Media Association. Bob earned a B.A. in English literature from Ohio Northern University and has a law degree from the University of Akron.