Rocky Mountain high
SUBJECT VEHICLE: 2009 Chrysler Aspen.
SENSOR IN TIRE? Yes (attached through the valve stem mounting hole).
RESET PROCEDURE? Yes (whenever an old sensor has been replaced).
SPECIAL TOOLS NEEDED? No.
Two tire pressure monitoring systems (TPMS) are available for the 2009 Chrysler Aspen. The Base TPMS consists of sensors attached to each wheel through the valve stem mounting hole; a Wireless Control Module (WCM); and an indicator lamp. The Premium TPMS consists of sensors also attached to each wheel; a WCM; three wheel sensor transponders located in three of the four wheel wells; an electronic display; and an indicator lamp.
Upon detection of low pressure, the WCM will send a request to the module that controls the indicator lamp to illuminate the lamp. A chime also will sound.
The WCM will store all warning conditions, which can be accessed through diagnostic communication. The WCM also will store all sensor IDs and locations in its memory.
After a sensor has been replaced, the WCM learns and stores the sensor IDs when the Aspen is driven above 15 mph for at least 10 minutes.
Sensor swap
When exchanging pressure sensors on the Aspen, remember that the vehicle’s valve stem caps contain O-ring seals to prevent contamination. Retain these caps for re-use. Also, do not re-use the sensor-to-wheel grommet. Always use a new grommet when installing a new sensor. Here’s the sensor swap process:
1. Remove the tire/wheel assembly from the vehicle.
2. Demount the tire from the wheel using the tire changer manufacturer’s instructions.
3. Using a thin-walled socket, remove the special nut retaining the sensor to the rim. While removing the nut, hold pressure against the rear of the metal valve stem to keep the stem from pushing to the rear.
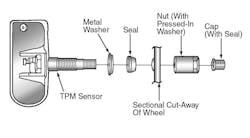
4. Remove the sensor from the wheel (see Figure 1). Replace the seal and metal washer at the base of the valve stem to ensure proper sealing.
5. Insert the new sensor through the wheel, keeping pressure against the rear of the metal valve stem. Make sure the potted side of the sensor is positioned toward the wheel. Do not try to mount the sensor in another manner or damage may occur.
6. Push down on the sensor housing to make it flush with the interior contour of the rim.
7. Using a thin-walled socket again, install the sensor nut. While holding the sensor in place, tighten the nut to 71 in.-lbs.
8. Mount the tire on the wheel and adjust the air pressure to specification.
9. Install the tire/wheel assembly on the vehicle.
Now you’re ready to retrain the new sensors you have installed.
[PAGEBREAK]
No formal process
Any time a tire sensor has been replaced, it must be retrained. There is no formal retraining procedure other than driving the Aspen for a minimum of 10 minutes at a continuous speed of more than 15 mph.
During this time, the TPMS will learn the new sensor ID code. If a sensor cannot be retrained, see the appropriate sensor manufacturer’s service information.
Keep in mind that under the following conditions, the Aspen’s TPMS may not work properly: a radio device of a similar frequency is used near the vehicle; the sensors’ batteries may be depleted; a spare tire has been installed; and a tire without a tire pressure sensor has been used.
There are a number of other critical factors to consider when servicing the Aspen’s TPMS.
First, the vehicle’s TPMS has been optimized for original equipment tires and wheels. This means that TPMS pressures have been established for the tire size that comes with the vehicle at OE.
Undesirable operation or sensor damage may result when using replacement equipment that is not the same size, type and/or style. Aftermarket wheels can cause sensor damage.
Also remember that the Aspen’s tires and wheels have been match-mounted at the factory. Tires must be remounted in the original position on the rim. You can accomplish this by placing a reference mark on the tire at the valve stem location.
A note about tire pressure warning monitor indicators: If the warning light is continuously lit due to low pressure in one or more of the tires, you must adjust the inflation level to the correct specification. The light will remain on until the proper tire pressure has been set.
After adjusting the air pressure in a tire, allow approximately two minutes for the message or indicator lamp to go out. If the warning light is flashing on and off for 60 seconds, there is a problem in the TPMS.
Finally, the use of tire sealants is strictly prohibited for vehicles equipped with TPMS. Tire sealants can clog sensors. ■
Information for this column comes from Mitchell 1’s ”Tire Pressure Monitoring Systems Guide” for domestic and import vehicles through 2008. Headquartered in Poway, Calif., Mitchell 1 has provided quality repair information solutions to the automotive industry for more than 80 years. For more information, visit www.mitchell1.com.
