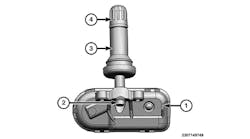
DESCRIPTION & OPERATION
The Tire Pressure Monitoring System (TPMS) checks the pressure and temperature of the tires when the ignition is in ON or RUN positions and sends the information to the Radio Frequency Hub (RFH) via the Controller Area Network (CAN). The TPMS activates a low pressure warning indicator on the instrument panel. TPMS functions are performed by the RFH and are transmitted at 433MHz. The RFH also performs the following functions:
- Locking/unlocking doors using the signals of the remote control buttons;
- Passive Entry via the signals from five antennas.
The system consists of four sensors, one installed on each road wheel that sends a Radio Frequency (RF) signal to the RFH, then to the Body Control Module (BCM) via CAN. Every time the ignition system is moved to the RUN position, the control unit conducts an initial check, when the vehicle moves, the sensors measure the pressure and temperature and transmit the initial status within five seconds to check tire function. If an insufficient pressure value is detected on one or more tires, the warning light on the instrument panel switches ON, a dedicated message is shown on the display and an acoustic warning is emitted. The system also highlights the tire or tires with insufficient pressure graphically.
NOTE: This TPMS uses the frequency of 433MHz. The 315MHz and 433MHz sensors are identical in size and shape; they are not interchangeable. Always make sure the correct sensor is being used. A RKE-TPM Analyzer can be used to determine the sensor's frequency without having to demount the tire.
TIRE PRESSURE SENSOR REMOVAL AND INSTALLATION
REMOVAL
1) Remove the appropriate tire and wheel assembly.
2) Remove the valve core from the valve stem and deflate the tire.
NOTE: The distance between the blade of the hydraulic arm and the sensor must always be greater than 80 mm.
3) Break the tire bead down with the TPMS sensor pointing at the 6 o'clock position and work from 1 o'clock to 5 o'clock.
4) Continue to remove the tire bead working clockwise around the wheel so that the sensor never enters the tool operating area.
5) Repeat the above steps on the inner side of the wheel.
6) Position the wheel on the tool chuck, taking care not to attach the wheel in the sector where the sensor is located.
NOTE: The distance between the blade of the hydraulic arm and the sensor must always be greater than 80 mm.
7) Lower the hydraulic arm to the edge of the wheel, ensuring that the sensor is at 180° (6 o'clock position) in relation to the hydraulic arm.
8) Pry the tire out of the wheel with an appropriate lever.
9) Turn the wheel to pry the tire bead off the rim
NOTE: The distance between the blade of the hydraulic arm and the sensor must remain greater than 80 mm.
10) Lift the tire from the wheel, lower the hydraulic arm on the inner edge with the sensor at 180° (6 o'clock) in relation to the hydraulic arm.
11) Pry the tire out of the wheel with an appropriate lever, turning the wheel.
12) Remove the tire from the wheel.
NOTE: Always replace the mounting nut with a new one.
13) Remove and discard the sensor mounting nut securing the sensor to the wheel and remove it.
INSTALLATION
NOTE: In case of replacement of the pressure sensor, connect the scan tool to the vehicle, select "Radio Frequency Hub (RFH)" in the "Miscellaneous functions," launch the procedure "Learning ID TPM sensors" and follow the instructions.
To verify the correct operation of the sensor, make sure the meter TPMS is updated to the latest release. The tool automatically updates by connecting to PC with the TPMS Manager software.
When the valve is removed from the wheel, it is necessary to replace it with a new one in good condition because the rubber seal may not fit perfectly in the valve opening later on.
Remember to verify the sensor is a 433 MHz TPMS sensor, and not the 315 MHz sensor, which is identical but not interchangeable.
1) Verify the sensor is intact and that the hole in the wheel is in good condition.
2) Check that the valve stem is fully inserted into the sensor housing.
3) Insert the valve stem into the hole of wheel and hand-tighten the sensor mounting nut.
4) Press the sensor from below with a vertical force so that the sensor is inserted completely within the valve stem.
5) Hold the sensor making sure to have contact with the wheel at least one point (left or right).
NOTE: Excessive torque can damage the sensor, and insufficient torque can cause leakage.
6) Tighten the TPMS sensor mounting nut to the proper torque.
7) Check that the valve is inserted completely in place and aligned with the wheel flange.
8) Verify that the sensor is in contact with the wheel at least one point (left or right)
NOTE: The initial sensor position must be at 6 o'clock in relation to the hydraulic arm, and the distance between the blade of the hydraulic arm and the sensor must always be greater than 80 mm.
9) Position the wheel on the tool chuck so the hydraulic arm is in contact with the edge of the wheel as shown in the diagram.
10) Lubricate the entire wheel surface and the inner and outer tire bead area.
11) Position the inner edge of the tire on the wheel using the hydraulic arm.
12) Turn the chuck and press on the tire by hand until it is fully fitted.
13) Do the same to fit the outer edge.
14) Inflate the tire to the recommended pressure.
15) Tighten the valve core on the valve and remove the wheel from the tool.
16) Install the tire and wheel assembly.
TORQUE SPECIFICATIONS
DESCRIPTION N.m Ft. Lbs. In. Lbs.
Wheel Mounting Bolts 120 89 -
Tire Pressure Sensor Retainer Nut 8 - 71


